Table of Contents
TV Manager User Guide
Overview
TV Manager is a digital signage tool and a comprehensive live sport and betting screens platform, specifically tailored to sports betting markets. It is an easy-to-use drag-and-drop media system that allows users to create and manage betting pages, view live sports, engage customers with promos, organize playlists, and much more.
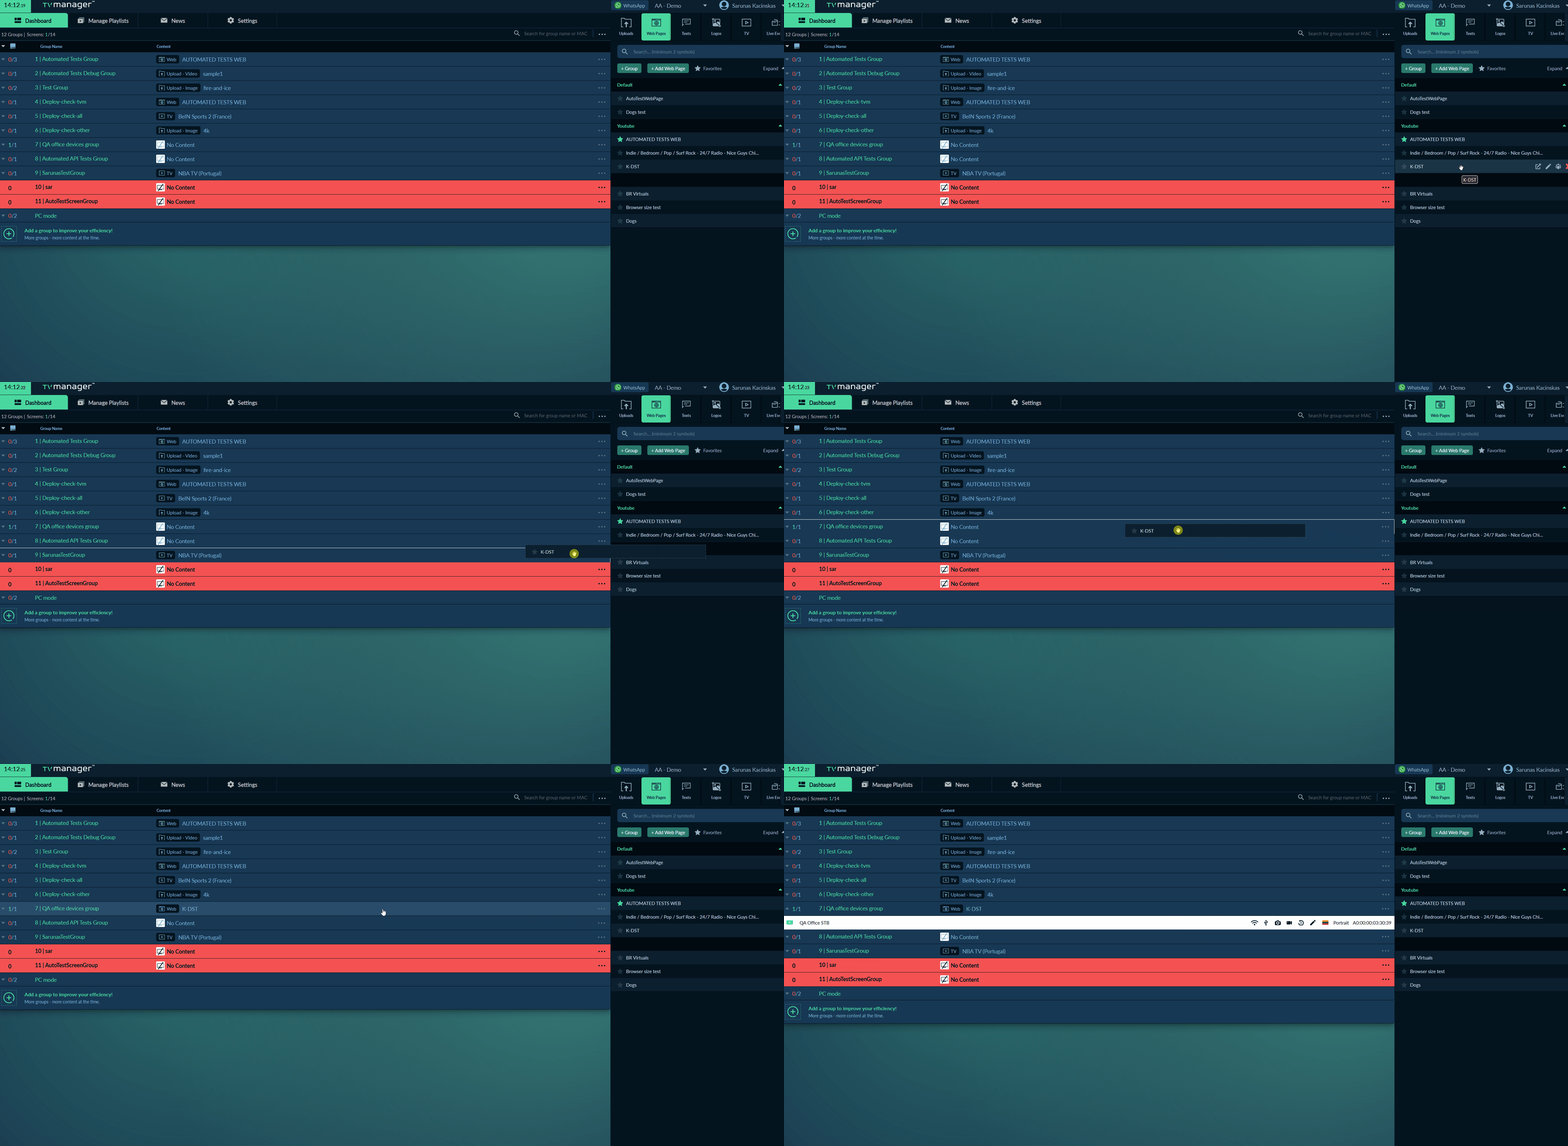
The entire TV Manager system is based on a drag-and-drop method of management, i.e. all the user needs to do to see the content is to drag the desired content and drop it on the group of TV Manager set-top-boxes.
Content Types
Uploads
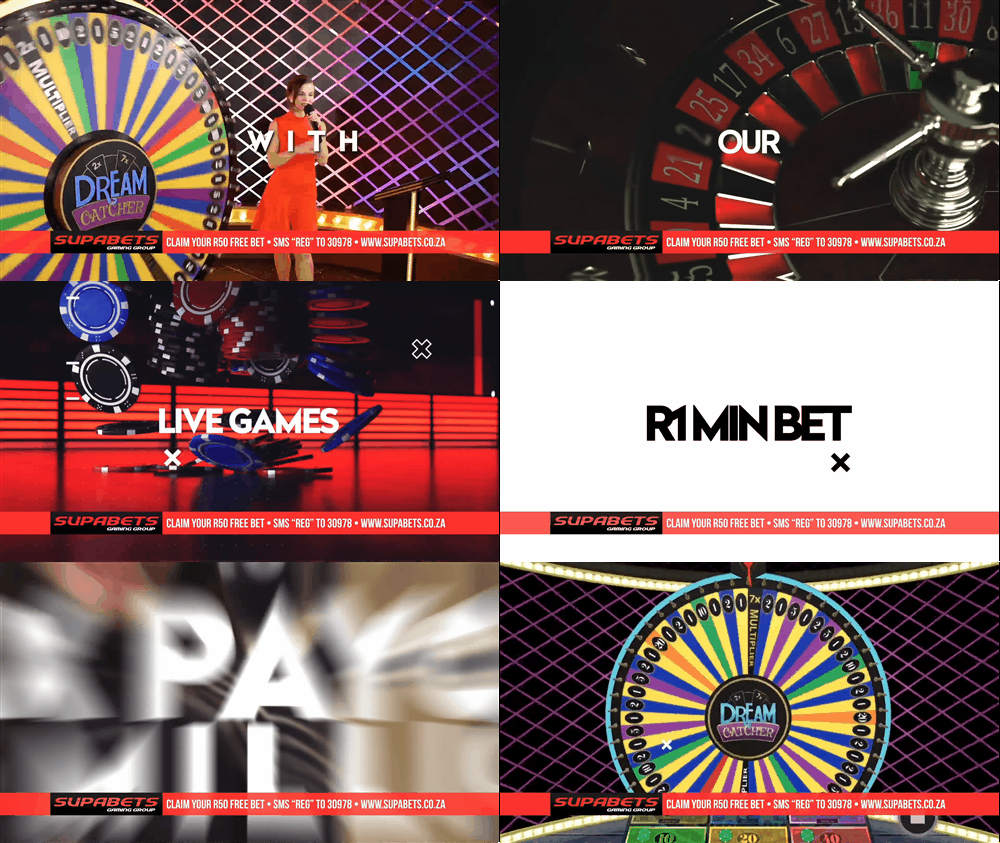 Uploads are mostly used to show any advertisement that the user wants.
Using Uploads TV Manager users can upload an unlimited number of promotions as videos, images, and PDFs directly to TV Manager and show them to their customers.
All Files can be uploaded directly from the TV Manager user interface.
Web Pages
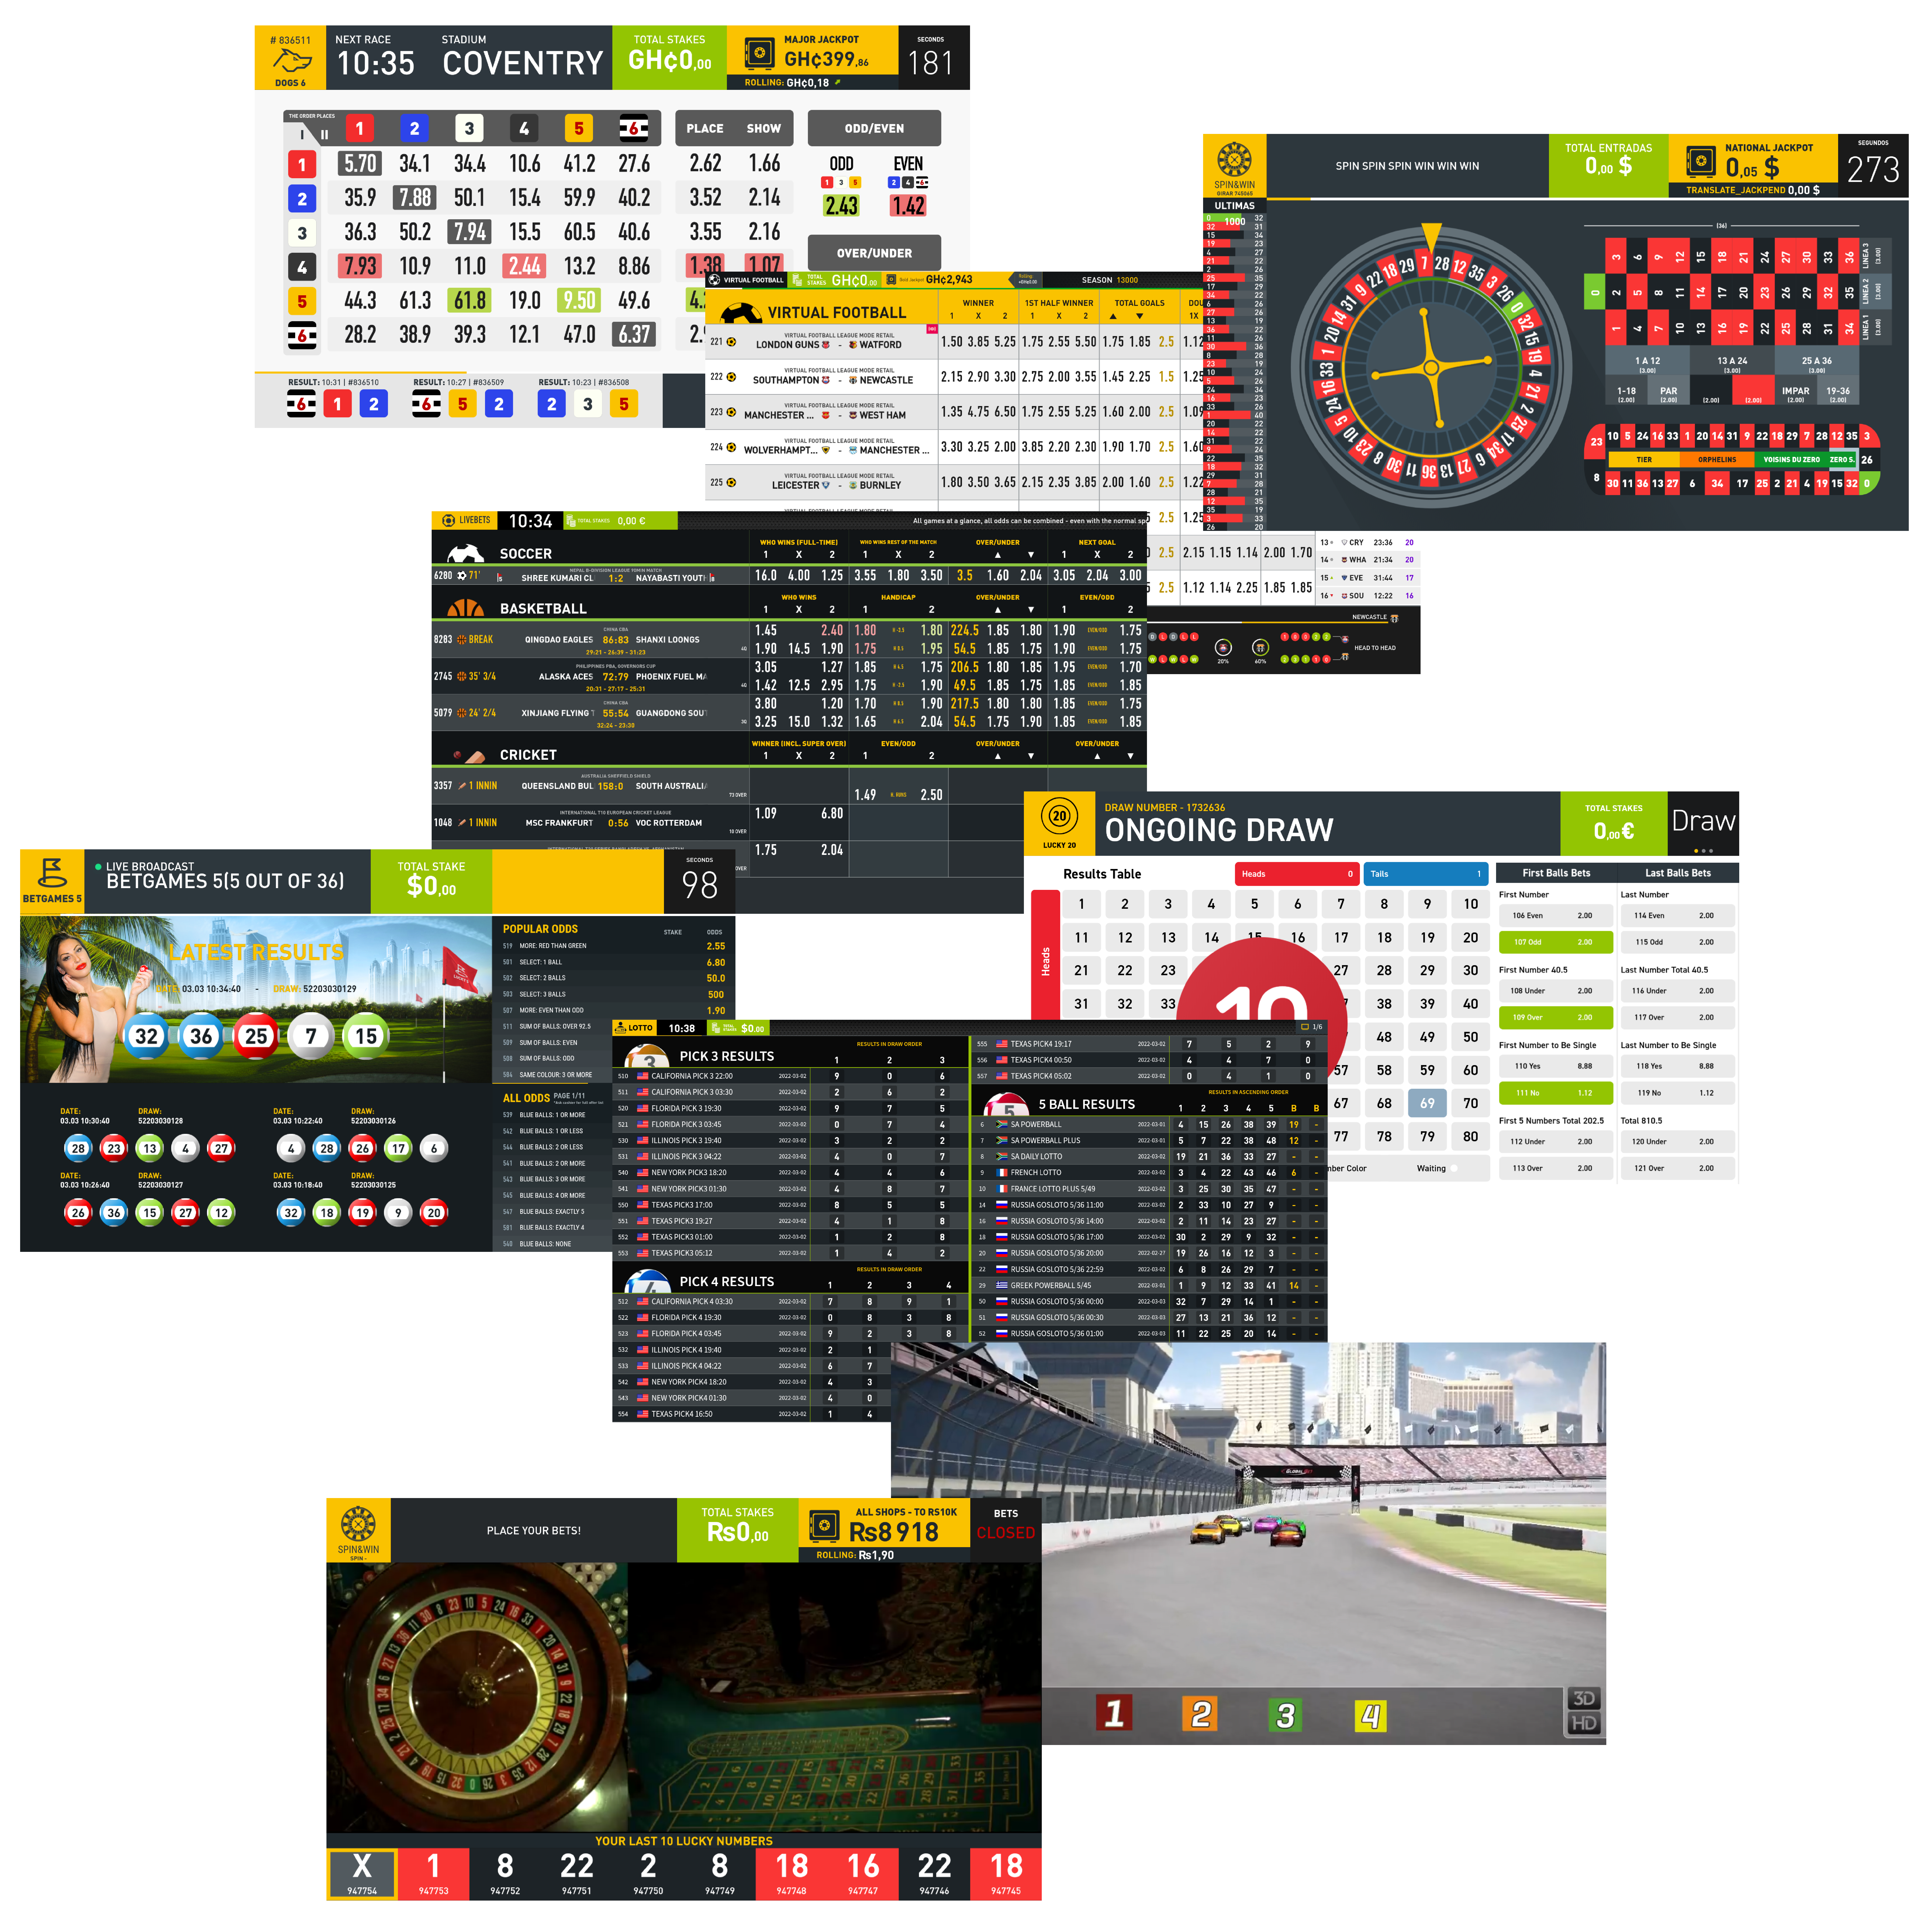 Betting Web Pages are a core feature of TV Manager use in betting shops. They allow displaying of various games and products on TV screens anywhere TV Manager set-top-boxes are used.
Web Pages allow displaying web content, whether it's a webpage, an embedded video from an external video platform, or even an audio stream. Utilized to its max capabilities.
Currently, the most used case for web pages is displaying betting games in betting shops.
Texts
Texts can be used alongside other media types like uploads, web pages, TV channels, live events, and odds. Texts are mainly here to put out quick messages for customers to inform them about recent and mostly temporary changes.
There are 7 types of texts in TV Manager:
- Running Line
- Movie Credits
- Static Text Top Left
- Static Text Top Right
- Static Text Bottom Left
- Static Text Bottom Right
- Static Text Center
Logos
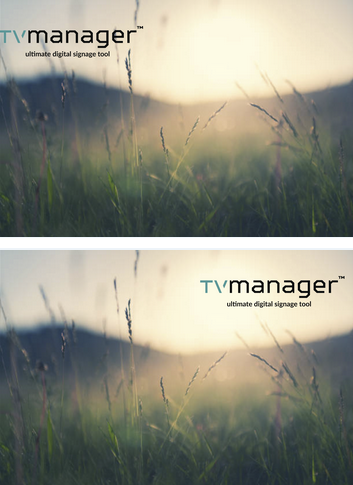 Logos similar to texts can be used alongside other media types like uploads, web pages, TV channels, live events, and odds. Logos are for showing any user uploaded logo on top of the playing media.
Logo position on the screen can be set by selecting from 4 predefined positions or by adjusting the custom position.
TV Channels
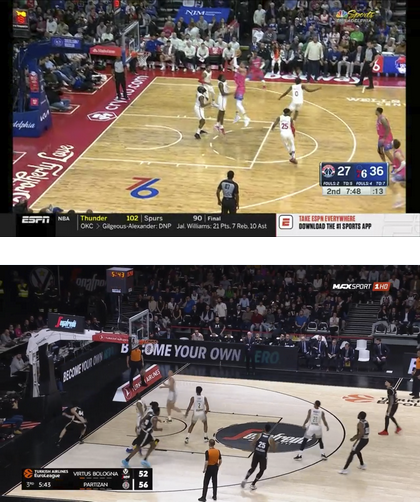 TV Manager allows users to watch sport or any other channels user wants by dragging and dropping the channel on the screen group.
The user also has the possibility to display client-maintained IPTV channels.
Most TV channels have EPGs so users can easily follow the channel schedule.
Live Events
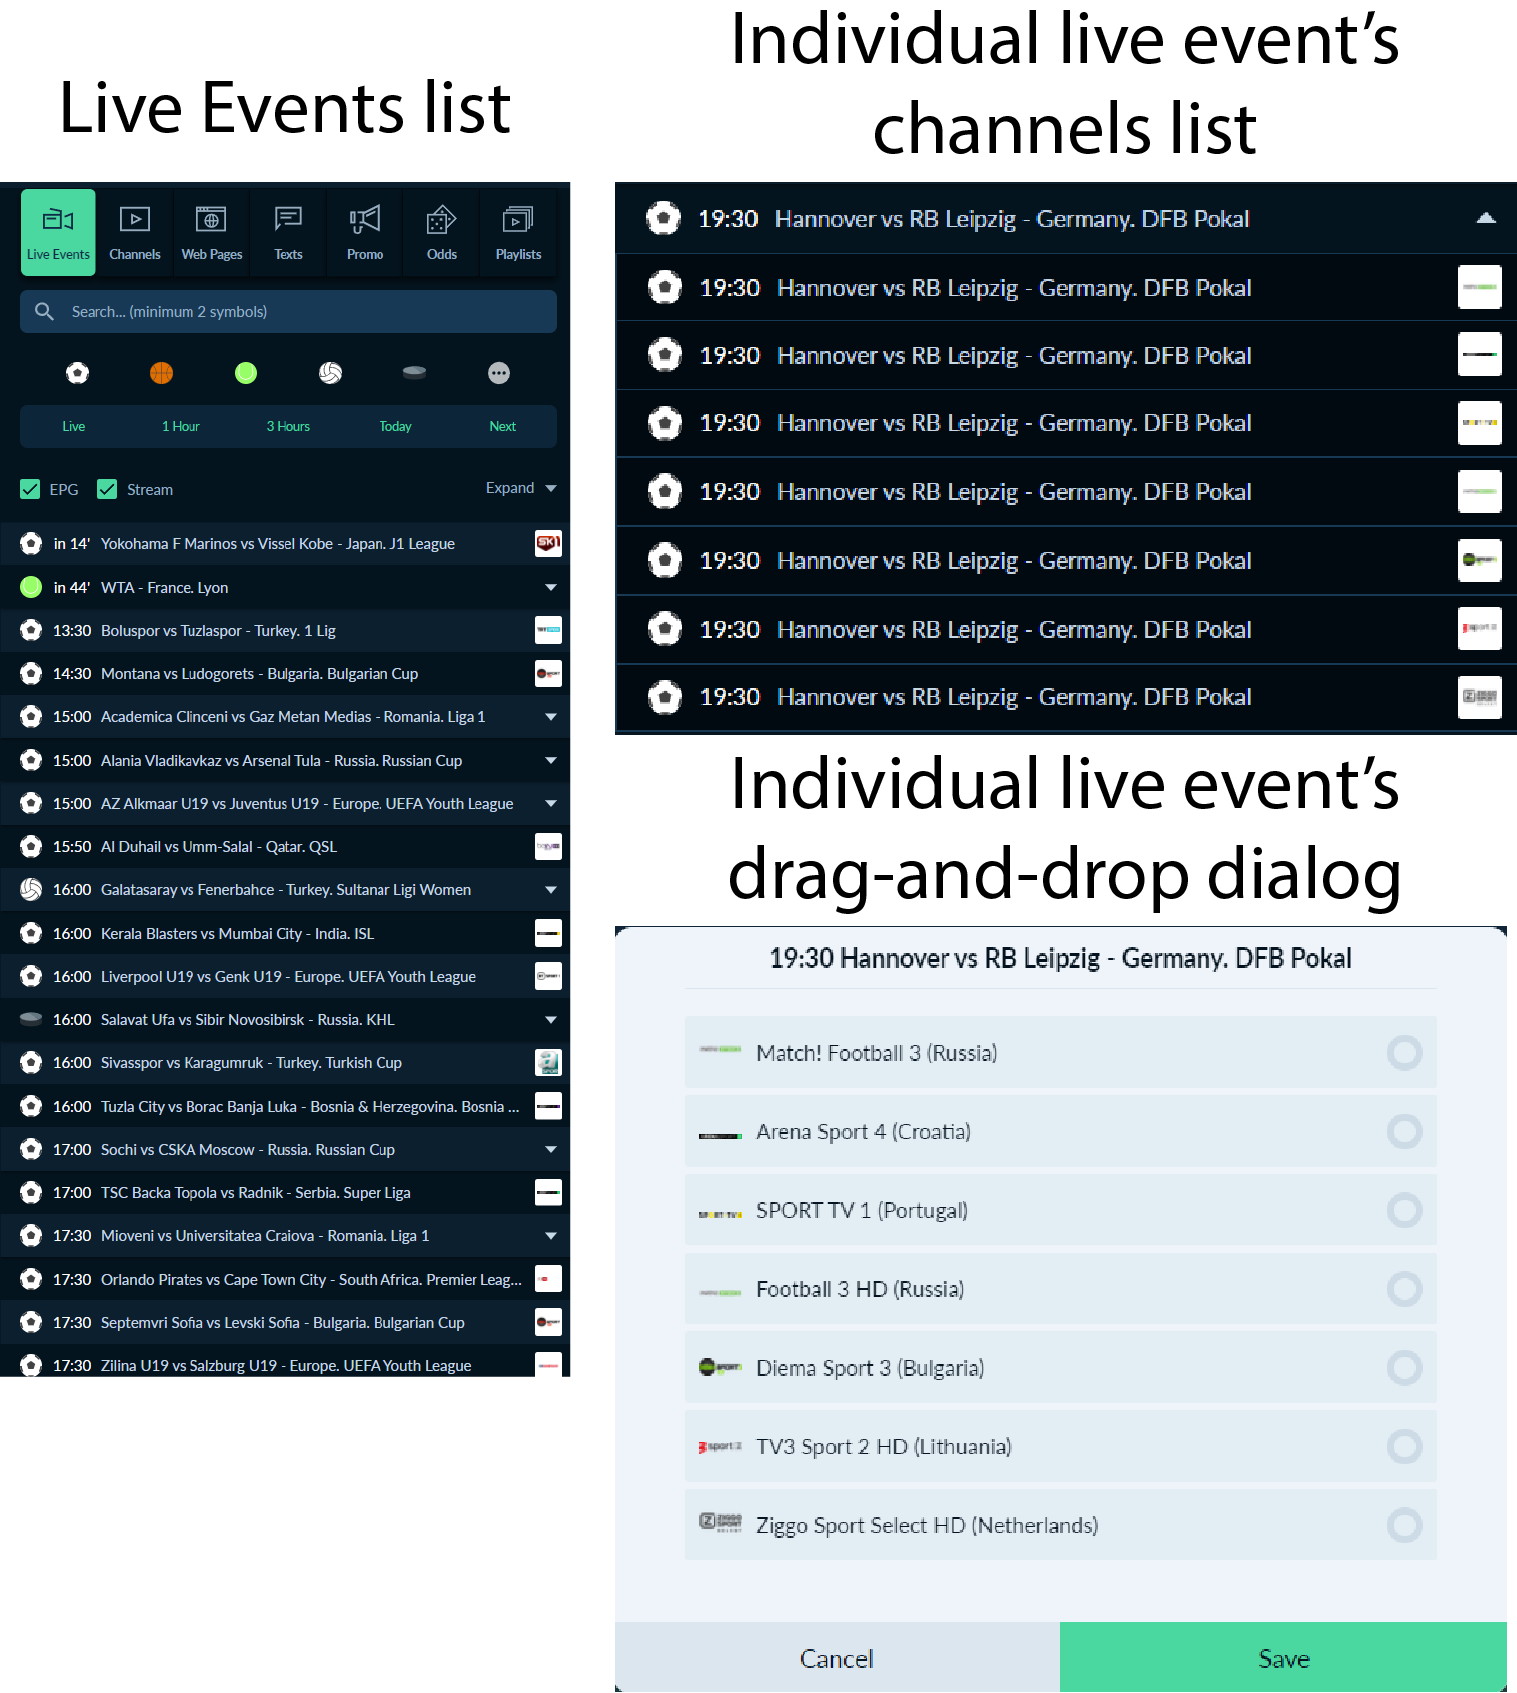 One of the main and best-utilized features of TV Manager is live events. There are more than 150 live channels to choose live sports events from. TV Manager features an easy-to-use interface where each user can choose which matches or sporting events he or she wants to view.
The following sports are currently included in the Live Events tab in TV Manager:
| Football | Basketball | ||
| Tennis | Volleyball | ||
| Ice Hockey | American Football | ||
| Australian Football | Badminton | ||
| Baseball | Beach Badminton | ||
| Bowls | Boxing | ||
| Counter Strike | Cricket | ||
| Cycling | Boxing | ||
| Darts | Dota 2 | ||
| E-Basketball | E-Football | ||
| Field Hockey | Futsal | ||
| Golf | Handball | ||
| Horse Racing | Indoor Football | ||
| League of Legends | Mixed Martial Arts | ||
| Rugby | Snooker | ||
| Squash | Table Tennis | ||
| Water Polo | |||
Odds
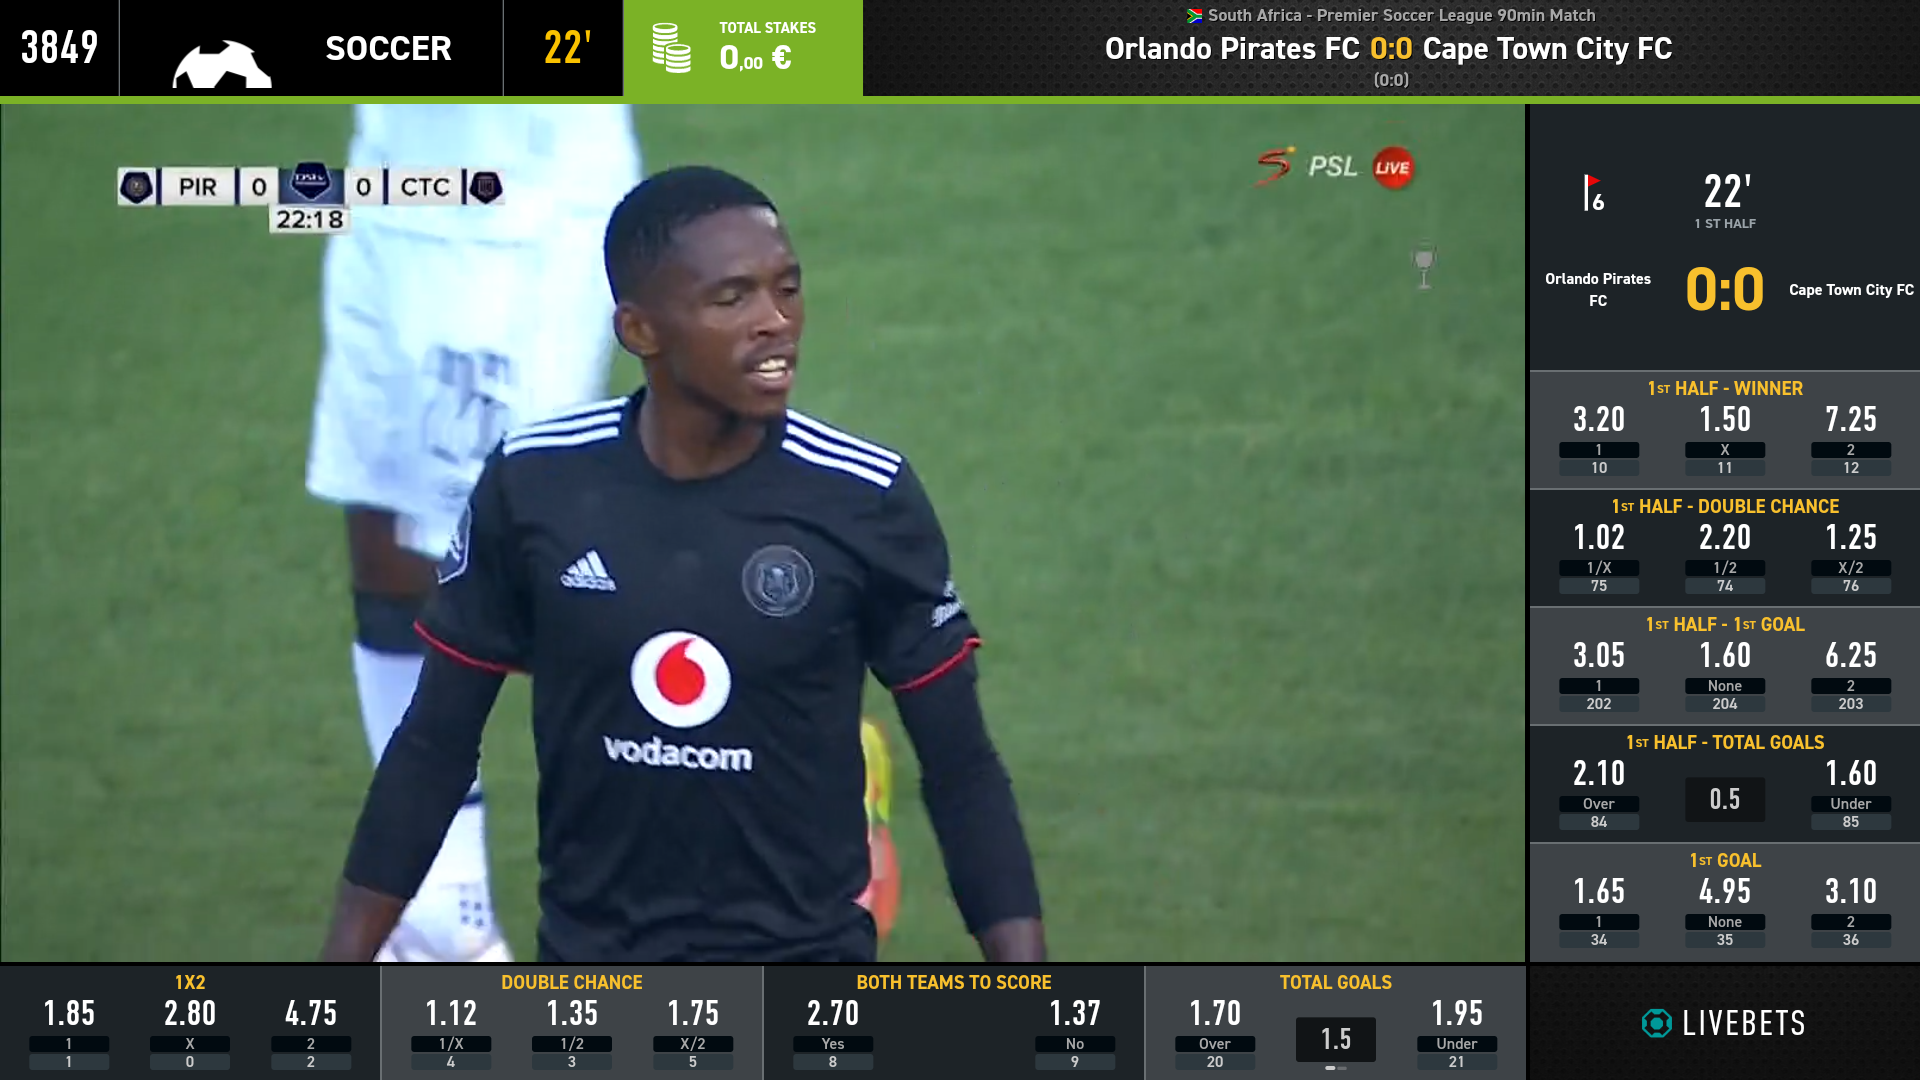 TV Manager allows sporting live events to be shown together with their live odds. Whether it is football, basketball, tennis, cricket, or any other sport, organizations can offer their customers an unparalleled betting and game-viewing experience in their betting shops and bars.
For all sports, the live odds experience is tailored to each sport specifically, meaning the betting markets and their changes throughout the event are customized to each sporting event. The bottom part of the odds stays constant throughout the match, offering the most popular betting options, such as winner, totals, and handicaps. The section on the right is tailored to the quarter or period the game is currently in, e.g. if a football match is currently in the 1st half, the betting markets on the right part of live odds will be tailored specifically to the first half of the match.
Playlists
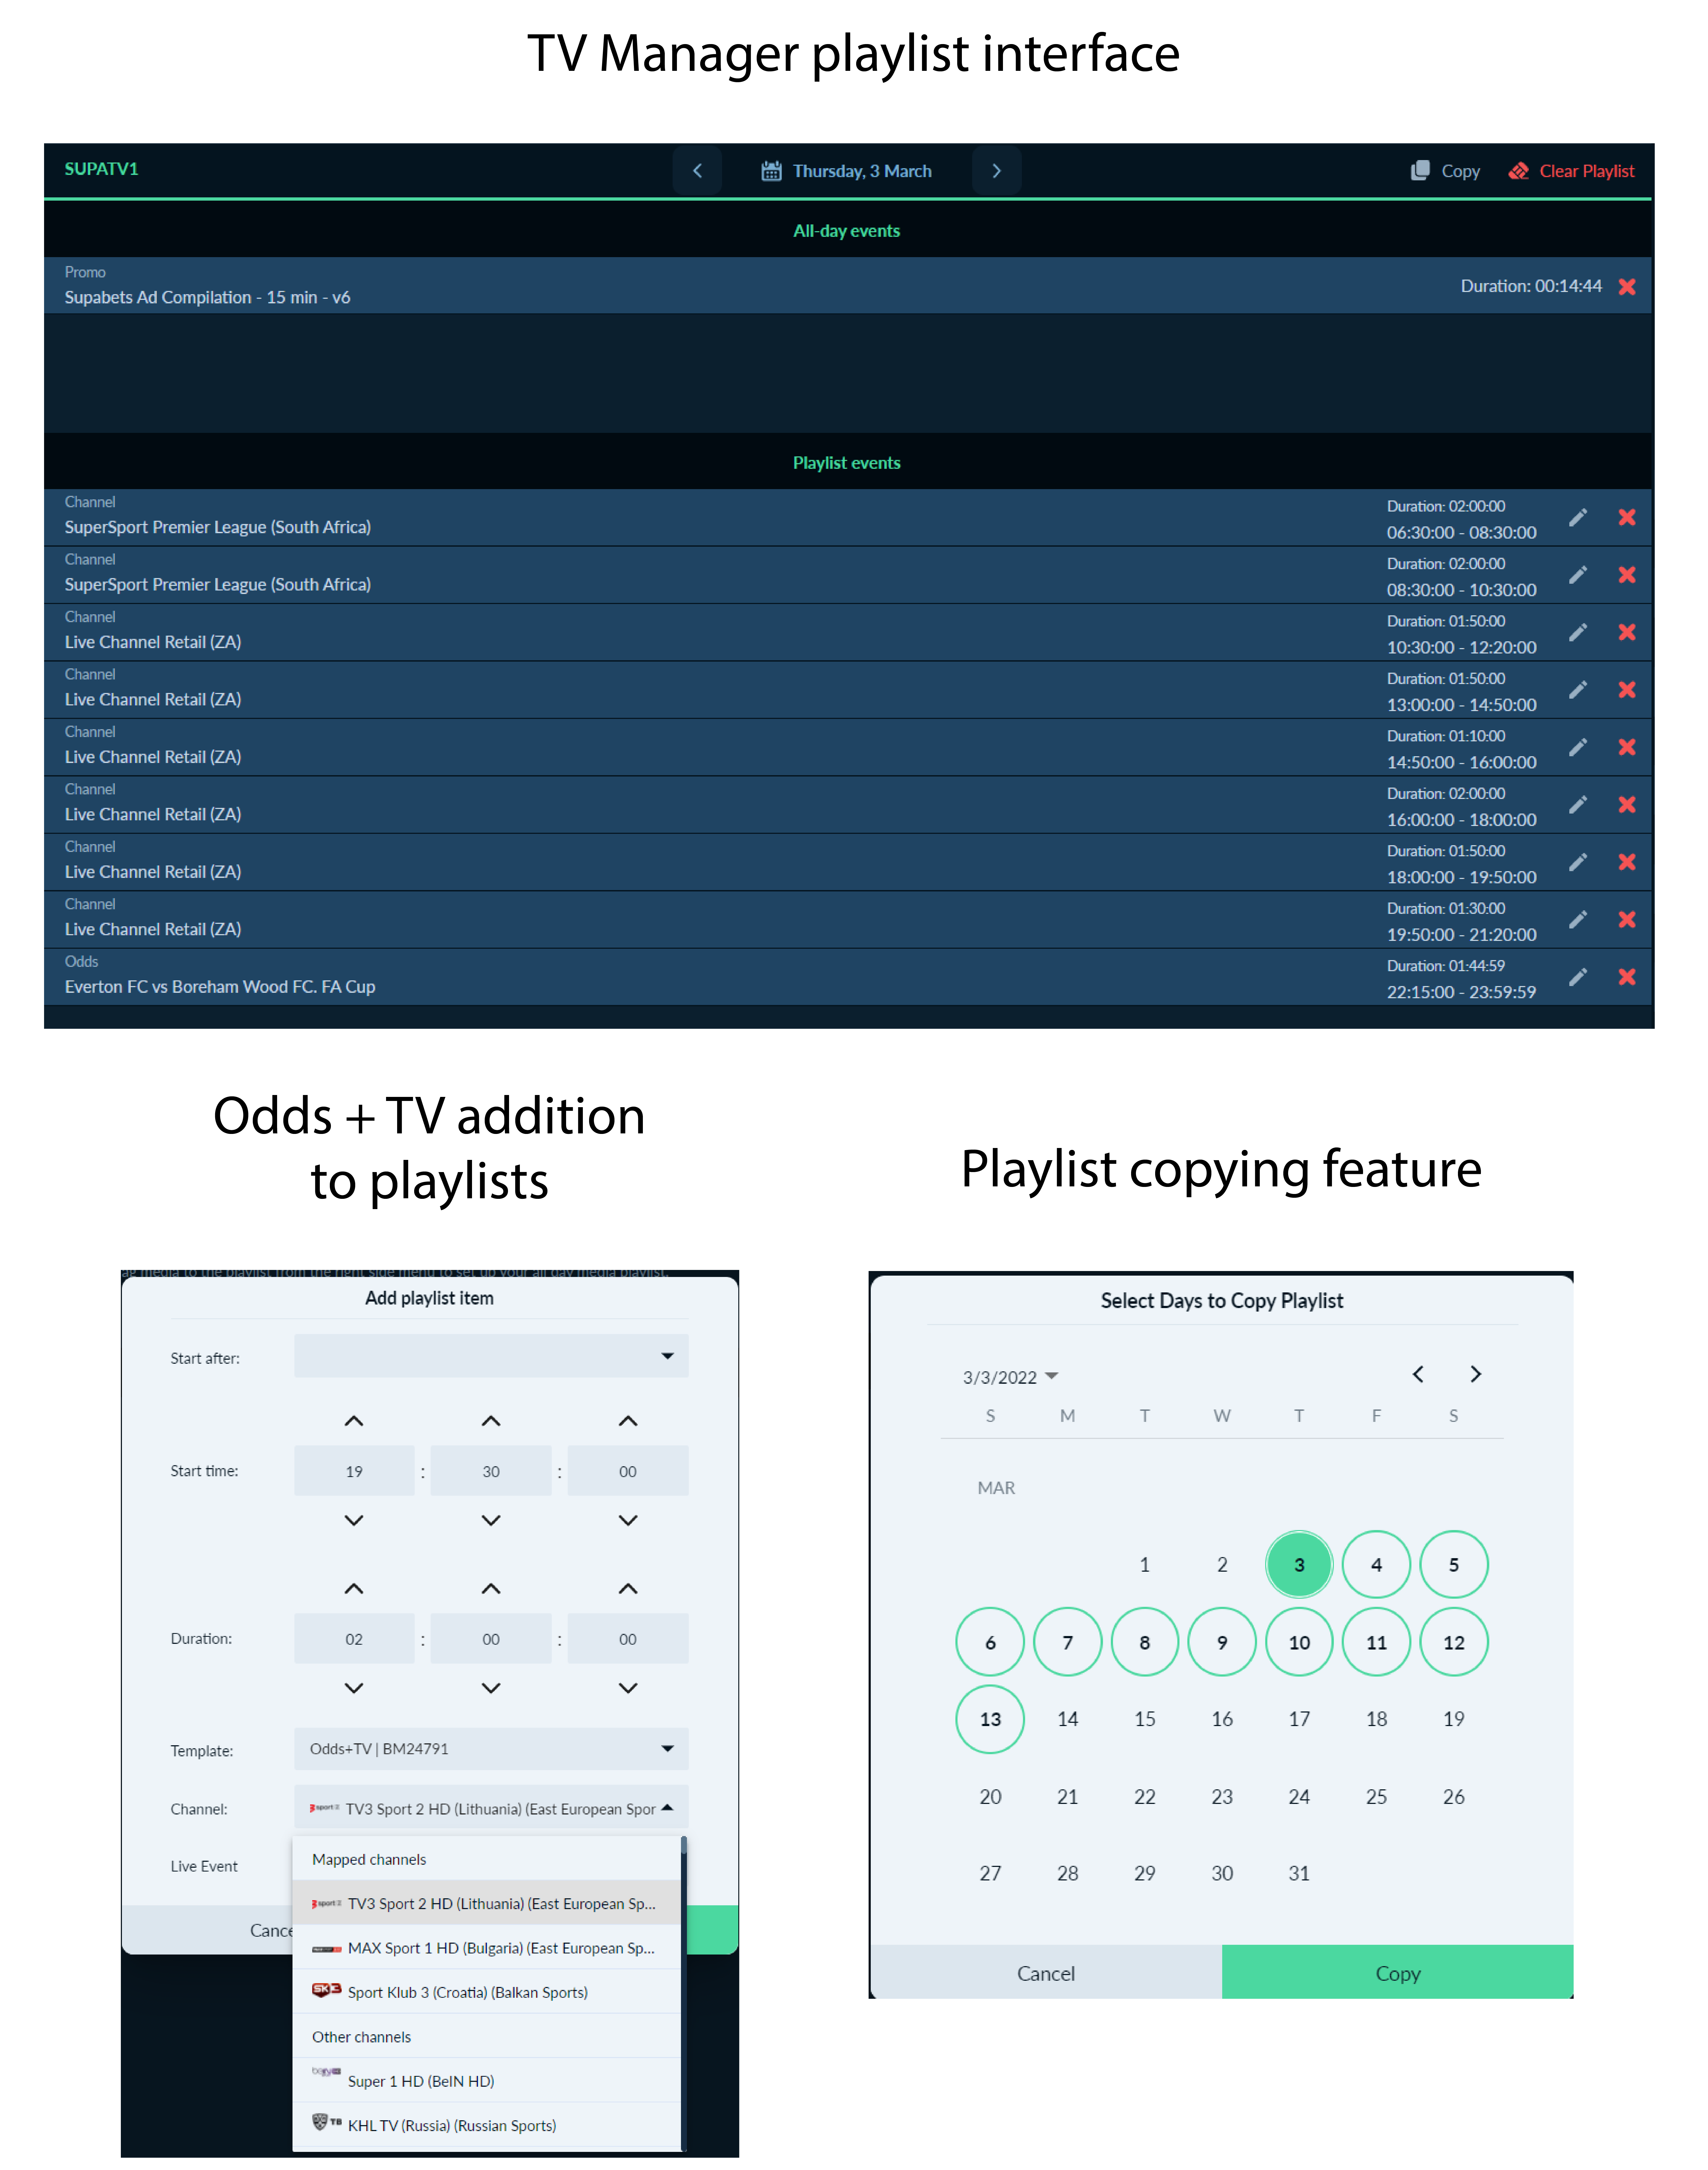 Playlists combine all the TV Manager features into one solution for media management. Users can create and manage an unlimited number of playlists. All TV manager media types can be added to the playlist by dragging and dropping from the sidebar.
It is two types of playlists:
- All-day events - it is for playing and managing all content types except Odds and Live Events.
- Playlist events - can be used for playing and managing all types of media.
Login
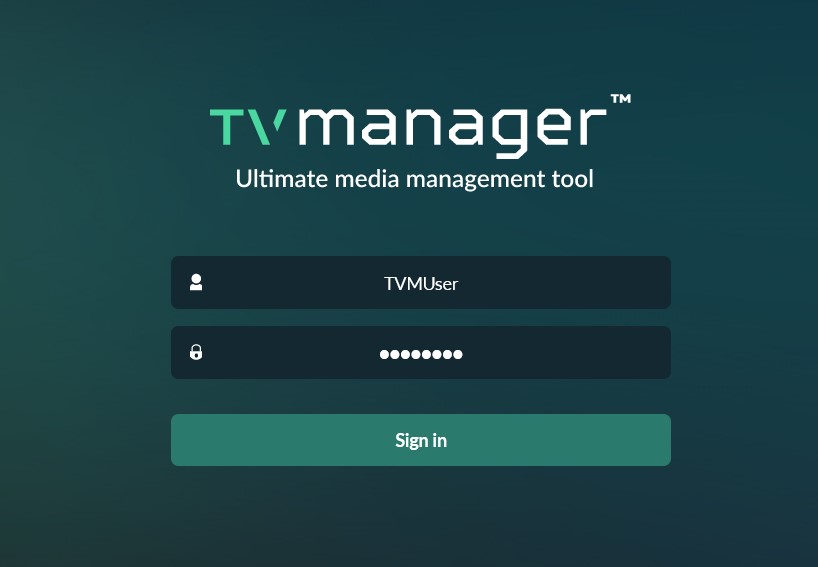
Only the registered and logged in users can use the TV Manager. It is not possible to use TV Manager without logging in.
At first logging in the user can select the language in which the TV Manager will be presented. Later the language can only be changed by clicking on the user name in the navigation menu and selecting the wanted language from the languages dropdown menu.
To log in to the TV Manager user should enter the email as username and the password.
Navigation Menu
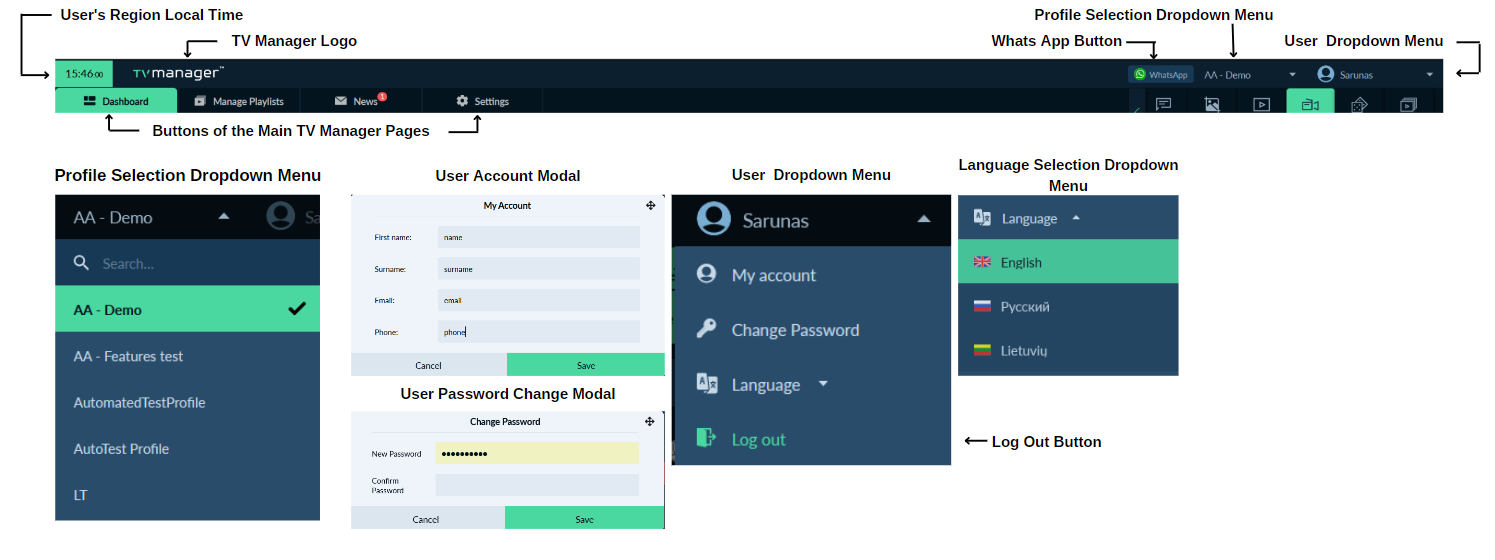
At the top navigation menu, the user can find:
- User selected region local time
- TV manager logo
- WhatsApp button - where the user can reach out to TV Manager support via What's App. By clicking on it the user will be redirected to the WhatsApp page.
- Profile selection dropdown menu - where the user can select any of their managed profiles.
- User dropdown menu - where the user can find multiple options like:
- My account - where user can update their info such as Name, Username, Email, and Phone Number.
- Password Change - where user can easily change their password by entering the new one. It is not required to enter the old password.
- Language Selection - at the language selection menu user can select from English, Russian or Lithuanian languages and all the TV Manager UI will be translated into the selected language.
- Log Out button - by clicking on it user easily can log out from TV Manager.
Under the top navigation, it is four buttons for the main TV Manager Pages:
- Dashboard
- Manage Playlists
- News
- Settings
The dashboard page will be displayed by default when the user logs in to the TV Manager.
Dashboard Page
 The main page of the TV Manager is the Dashboard, where users can easily manage which content and on what screens should be played.
The three most important things on the Dashboard page are:
- Screen Groups - a block of screens where the content should be dragged and dropped. What content is playing is also visible on the screen group. Screen groups have the possibility to change the volume of the screens in the group. It is also possible to edit screen groups, pause and clear TV, clear all content, and set periodic restarts for the screens in the group.
- Screens - if the screen group is expanded all the screens of that group are displayed. Screens have multiple options like Wi-Fi access point setup, USB files syncing, photo and video capture, screen restart, and editing.
- Side bar - at the side bar user can find all their content. All content easily can be played by dragging it from the side bar to the Screen Group.
The side bar is separated into eight sections of different content types, to navigate between these sections it is only needed to click once on the wanted section.
Playlist Management Page
The Playlist Management page is for Unlimited playlist management.
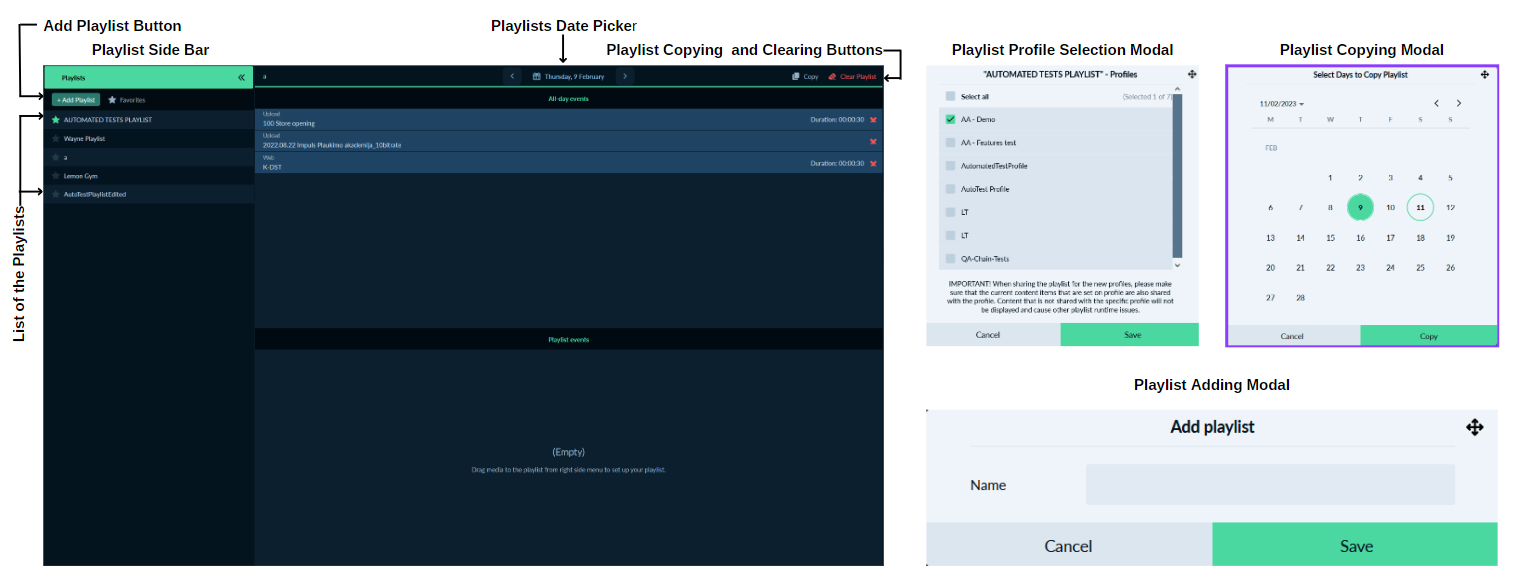
The Playlist Management page has a Playlist sidebar on the left screen side where a list of playlists is displayed.
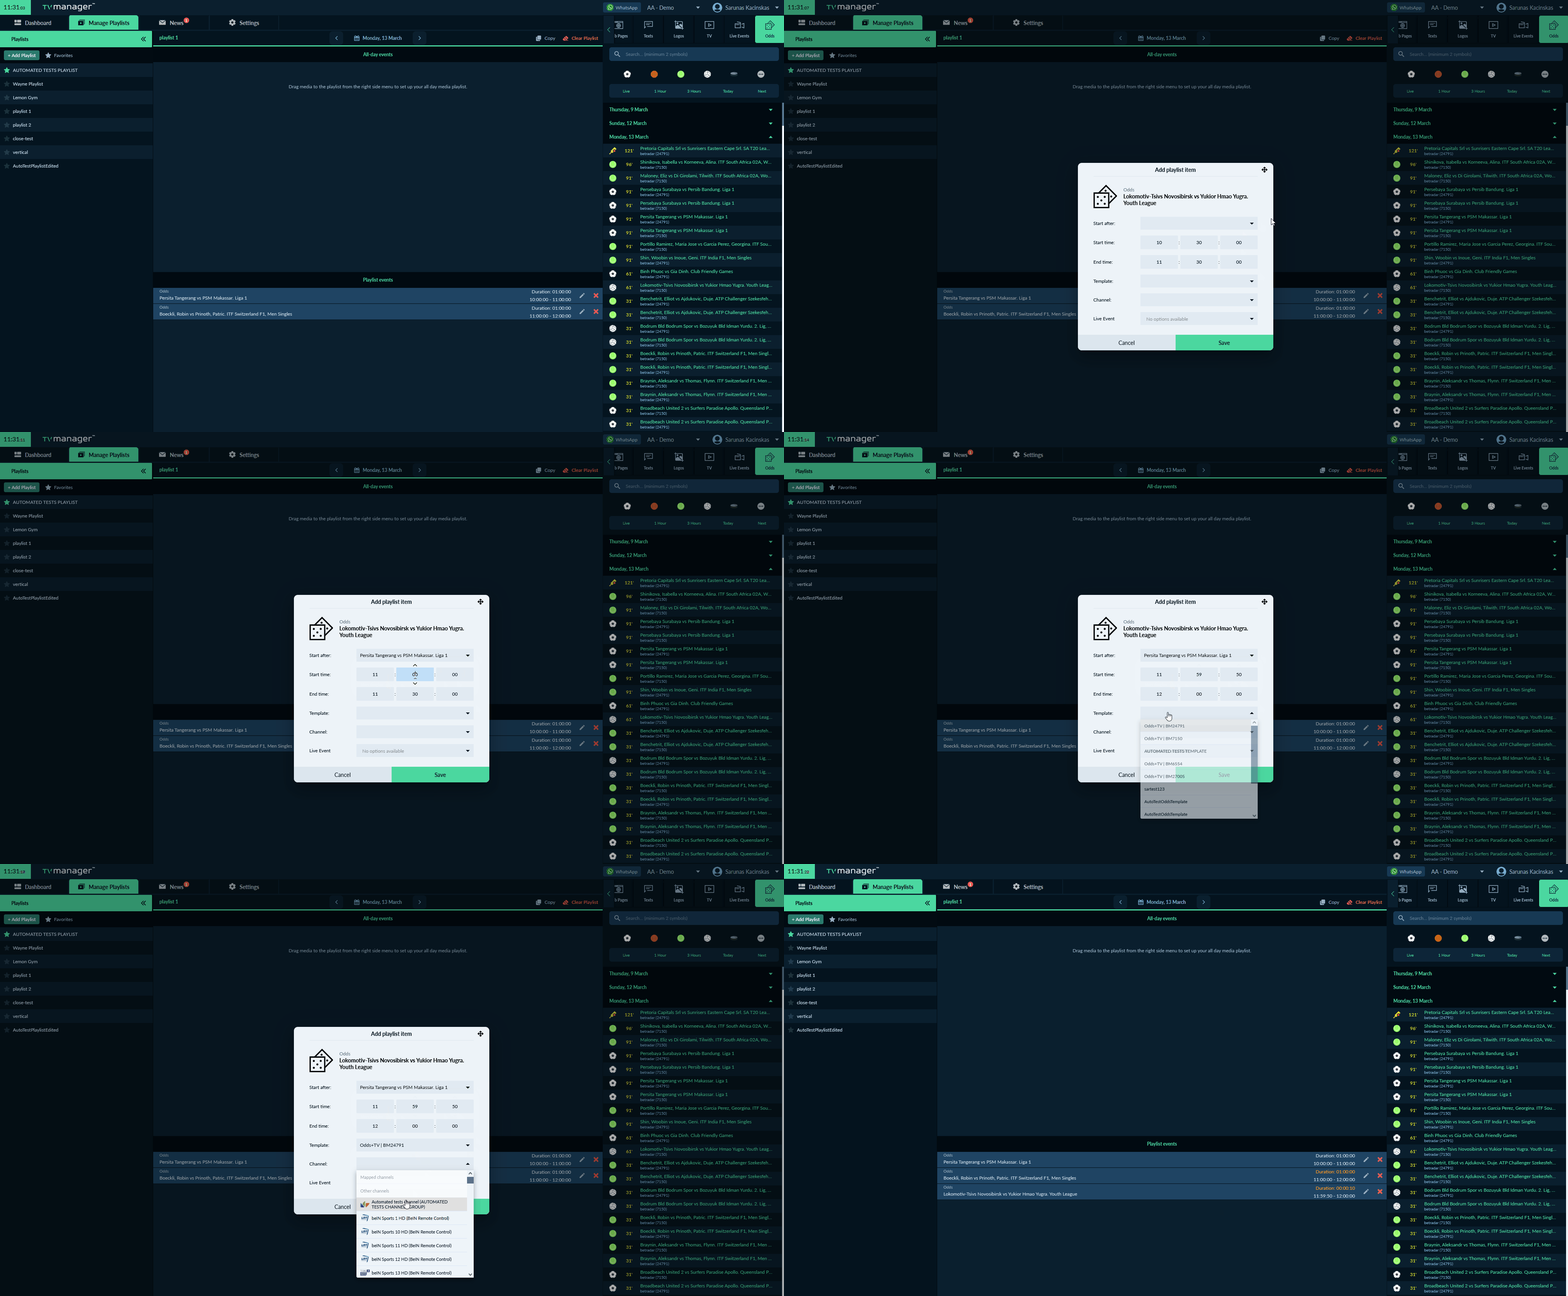
For adding a new playlist the user should click on the "+ Add Playlist" button. It will open up the Playlist creation modal where the user needs to write a name for the playlist and click the "Save" button. The created playlist will appear in the playlist management page sidebar and on the sidebar playlists section on the dashboard. It is also possible to edit, select profiles and delete playlists.
Playlists are separated into two types of playlists:
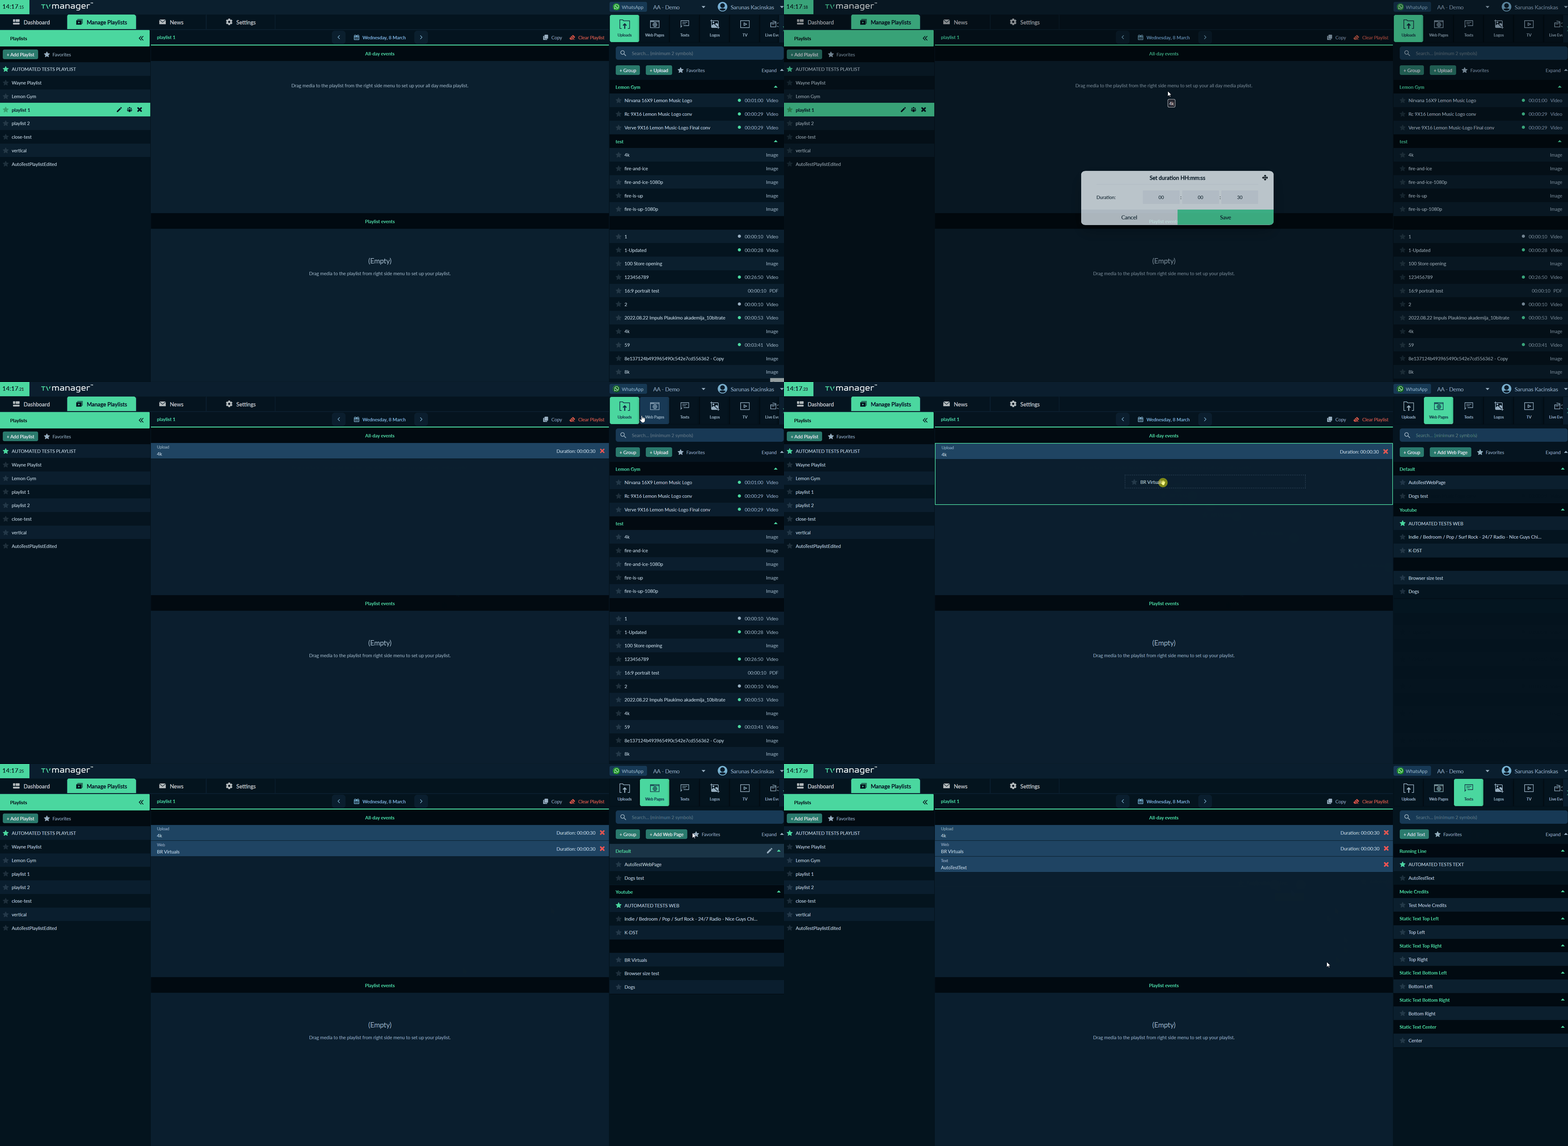
- All-Day Events - playing dragged content all day in the loop. All-day events can not be live and odds events. When dragging the content item to the all-day playlist it is only needed to set the duration.
- Playlist Events - playing dragged content in the specified time period. When dragging the content item to the playlist events it is needed to set the start and end times. For odds events, it is needed to select an odds template.
Uploads, Web Pages, TV, Live Events, and Odds Events overlap each other and change each other if content times are overlapping. The texts also change with other texts if their time is overlapping, it is the same with the logos.
To add content to the playlist user needs to select a playlist by clicking on it, then drag media to the playlist from the right-side menu to set up a media playlist. It is also possible to copy the playlist to another day and clear the playlist media.
The Playlist events section has two different views. By default, it will be displayed in the grid view, but is also possible to display it in the list view by selecting the toggle above the Playlist events section.

News Page
The News page is for news management and important information display for the user.
The news page has a navigation sidebar on the left screen side where all news is displayed. The highlighted news is displayed in cards that are provided in the main page area.
For adding news the user should click on the "+ Add News" button. It will open up the news-creating modal where the news for available profiles is created. to create the news it is needed to write a title, highlight the news or not, and if highlighted add a thumbnail, write a description, and click the "Save" button.
Created news will appear in the news page sidebar and if the news is highlighted it also appears as a new card.

Settings Page
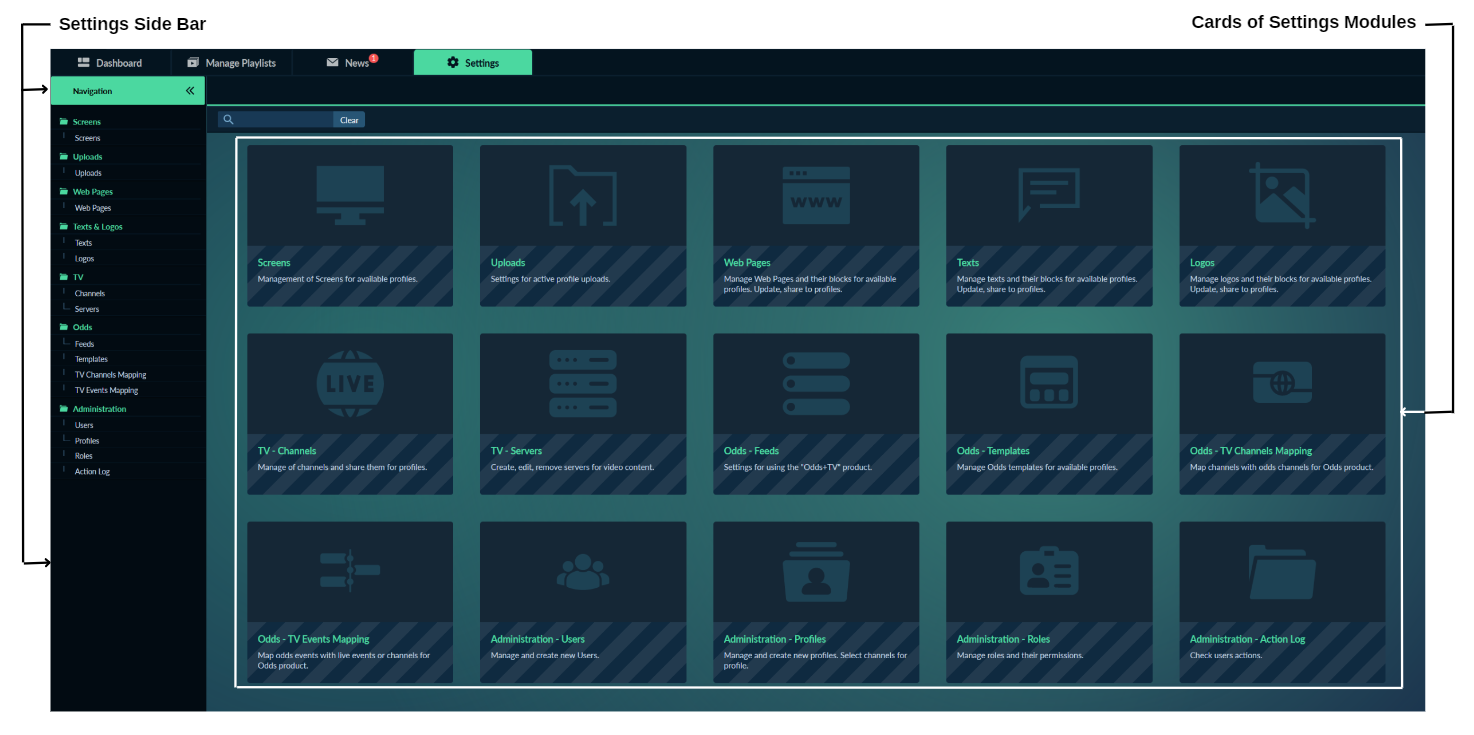 On the Settings page, it is all TV manager managing options, content creation, editing settings and etc…
The settings page has a navigation sidebar on the left screen side where different modules of settings can be selected. It is also can be selected by clicking on the settings cards.
In all the settings modules it is possible to filter and sort the table content by clicking on the arrows or by selecting wanted items in the table column headers.
Screens
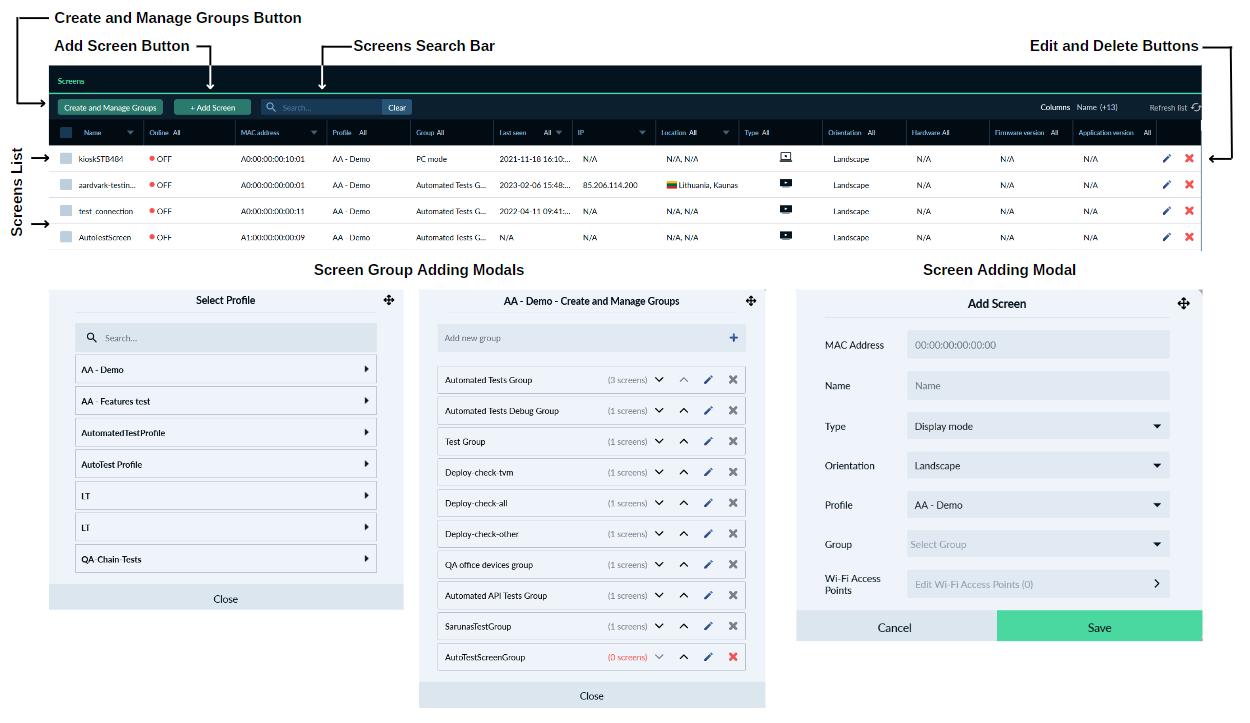 The Screens Settings Module is for screens and screen groups management for available profiles.
At the right side of the "Create and Manage Groups" and "+ Add Screen" buttons is a search bar where is the possibility to search for a screen by different search phrases like screen name, online status, MAC address, profile, screen group and by other columns displayed in the list of screens.
For adding a new screen group it only takes to click the "Create and Manage Groups" button, then select a profile in which the screen group should be created. The next step is to write the name of the wanted screen group and click the "+" to finish creating the screen group.
In this same modal of screen groups, can be set in which order they will be displayed on the dashboard page. The screen group order managing works very easily by clicking the up or down arrows on the screen group.
For adding a new screen the "+ Add Screen" button should be clicked. It opens a modal where the information of the screen like MAC address, and name should be entered. The other options like type, orientation, and group should be selected from dropdown menus. It is also possible to set up a Wi-Fi access point. After that screen can be saved and it will appear in the settings screens list and in the selected screen group on the dashboard page. It is also possible to delete and edit screens.
Uploads
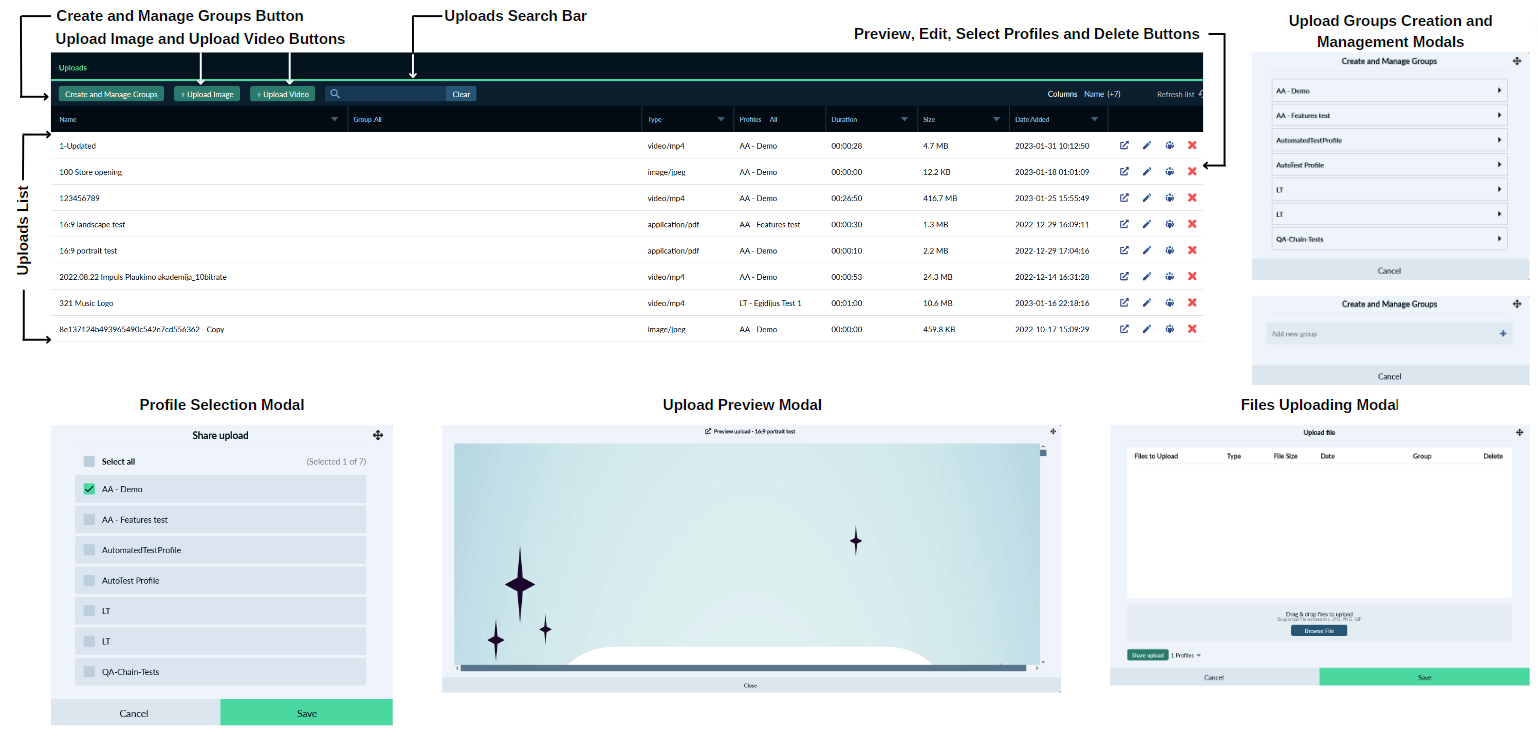 The Uploads Settings Module is for uploads and uploads groups management for available profiles.
Same as on the settings-screens page on the uploads page it is a search bar where is the possibility to search for an upload by different search phrases.
For adding a new upload group it only takes to click the "Create and Manage Groups" button, then select a profile, write the wanted name for the upload group, and click the "+" to finish creating the upload group.
The list of the available file formats to upload:
- JPG - image
- PNG - image
- GIF - image
- MP4 - video
- MOV - video
Maximum file size for any type of upload is 500MB.
For adding a new upload image or video the user should click on the "+ Upload Image" or "+ Upload Video" buttons. It will open up the files uploading modal where files can be added to upload by browsing files or by dragging and dropping the files from the user's computer to the file uploading modal. Files can be added one by one or by adding multiple files a the same time.
At the same modal, it is also possible to select the upload group for every added file, delete files one by one or all together, change added file names, and share all files together to the wanted profiles.
All uploaded files will appear in the settings-uploads list and in the sidebar uploads tab on the dashboard page. It is also possible to delete and edit the upload, select profiles, and preview it.
Web Pages
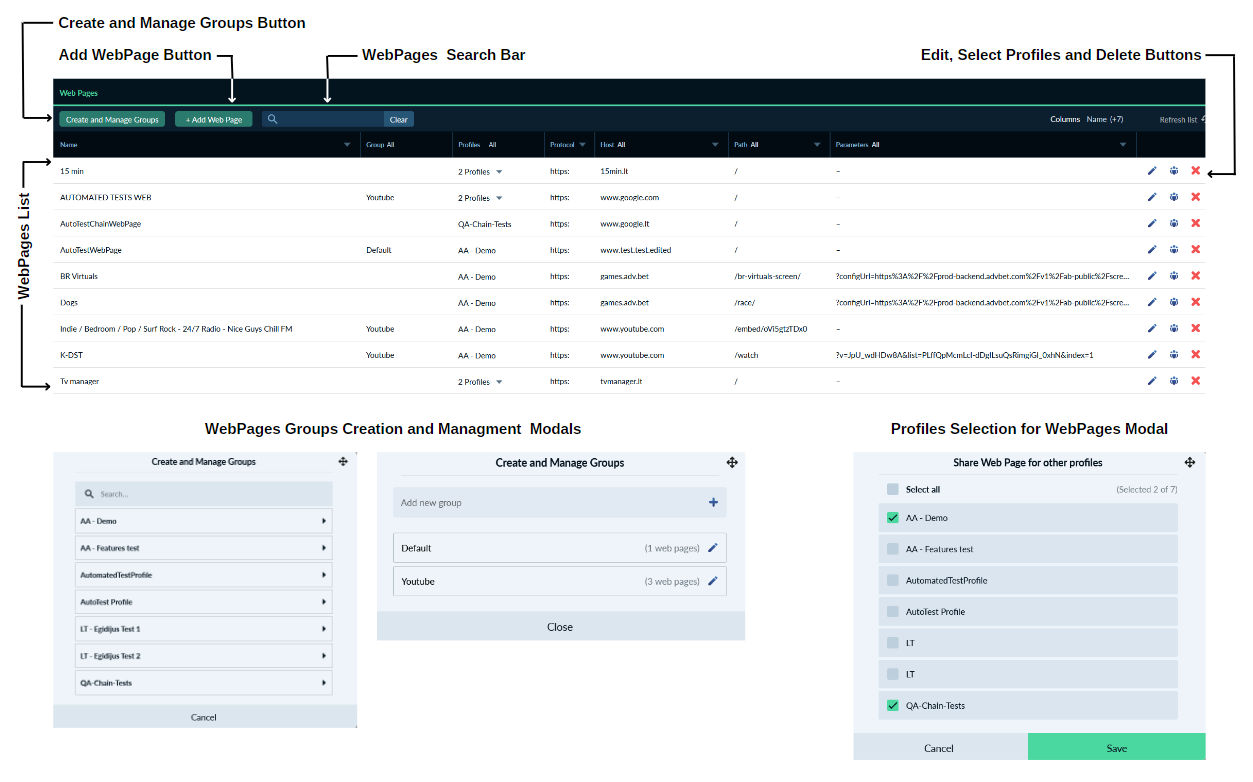 The web pages Settings Module is for web pages and their groups managing for available profiles.
Same as on the settings-screens page on the web pages page it is a search bar where is the possibility to search for a web page by different search phrases.
For adding a new web page group it only takes to click the "Create and Manage Groups" button, then select a profile, write the wanted name for the web page group, and click the "+" to finish creating the web page group.
For adding a new web page the user should click on the "+ Add Web Page" button. It will open up the web page creation modal where the user needs to fill in information about the new web page. It is needed to write a name for a web page, select a group of the web page and enter the wanted web page URL and click the "Save" button.
URLs of Web Pages are separated into different parts, for better filtering and search capabilities: Protocol, Host, Path, and Parameters.
The created web page will appear in the settings-web pages list and in the sidebar web pages tab on the dashboard page. It is also possible to delete and edit the web page, and select profiles.
Texts
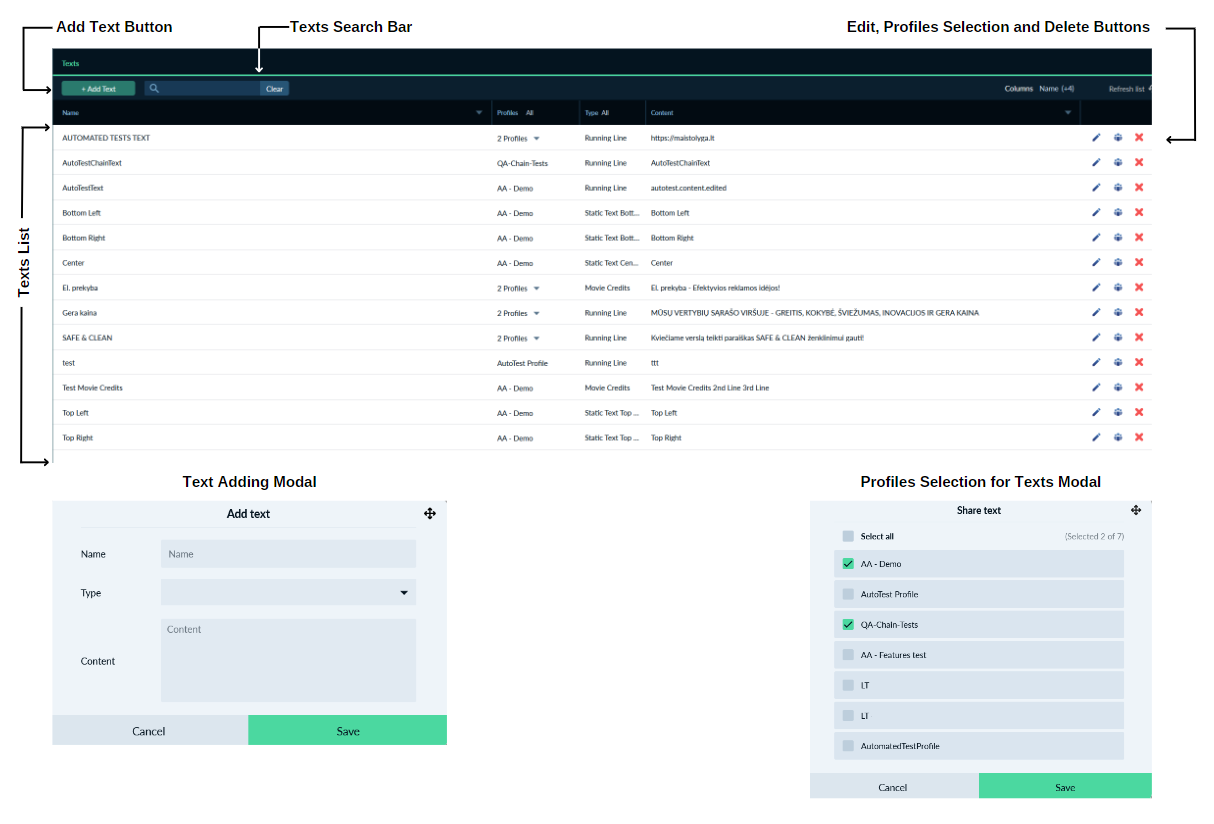
The Texts settings module is for texts managing for available profiles.
Same as on the settings-screens page on the texts page it is a search bar where is the possibility to search for a text by different search phrases.
For adding a new text the user should click on the "+ Add Text" button. It will open up the text creation modal where the user needs to fill in information about the new text. It is needed to write a name for a text, select a type of text, enter the wanted content for the text, and click the "Save" button.
Created Text will appear in the settings-texts list and in the sidebar texts tab on the dashboard page. It is also possible to delete edit the texts, and select profiles.
Logos
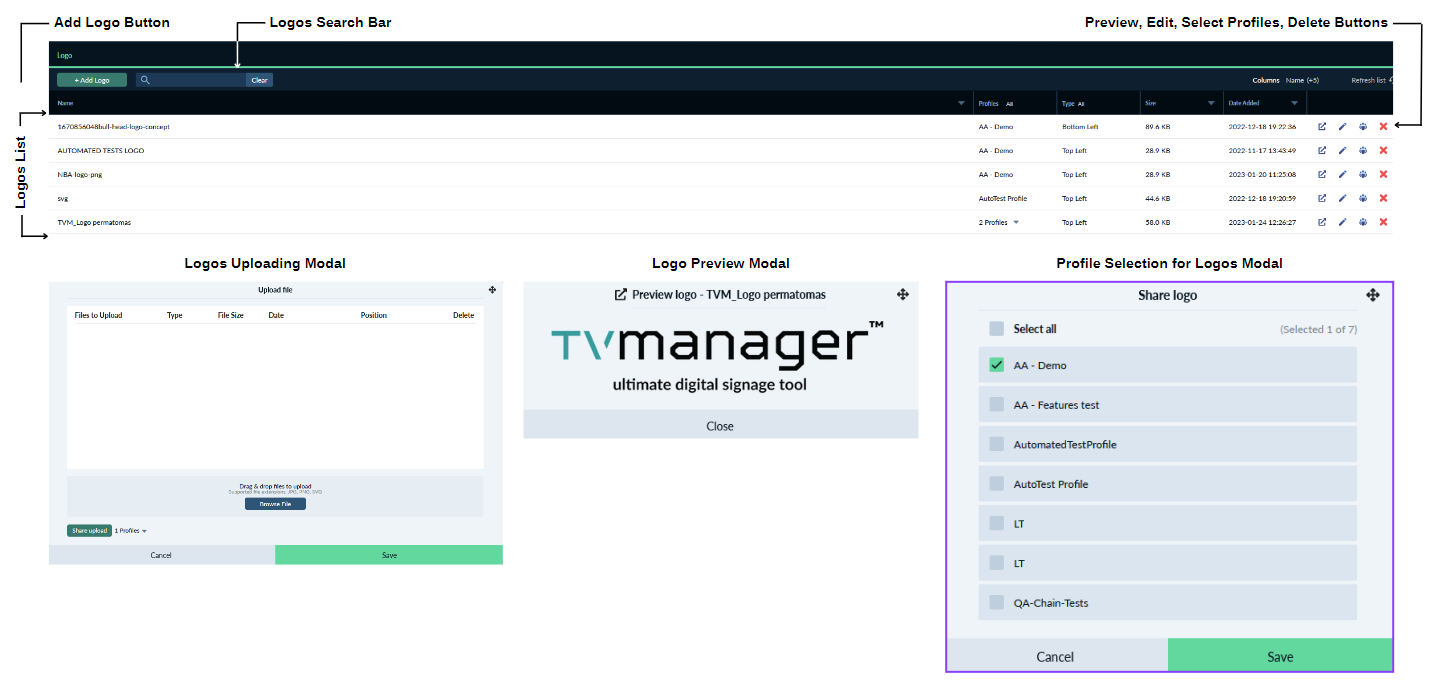
The Logos Settings Module is for logos managing for available profiles.
Same as on the settings-screens page on the logos page it is a search bar where is the possibility to search for a logo by different search phrases.
For adding a new Logo the User should click on the "+ Add Logo" button. It will open up the files uploading modal where files can be added to upload by browsing files or by dragging and dropping the file from the user's computer to the files uploading modal. Files can be added one by one or by adding multiple files at the same time.
At the same modal, it is also possible to select the position in which the logo will be displayed on the screen. it is possible to select from four predefined positions or select a custom position. It is also possible to delete files one by one or all together, change added file names, and share all files together to the wanted profiles.
Only JPG, PNG, and SVG types logos can be uploaded to the TV Manager.
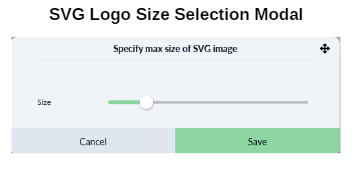 In order to have SVG files able to use, they are converted into PNG images instead. For this conversion, is it required to define the size (in pixels) of how big the image should be scaled. For that, an additional modal is thrown for the size selection, where this size should be specified, in a range from 10px to 1000px and have 200px set as the default value.
All uploaded logos will appear in the settings-logos list and in the sidebar logos tab on the dashboard page. In the logos list it is also possible to preview, edit, delete, and select profiles for logos.
Channels
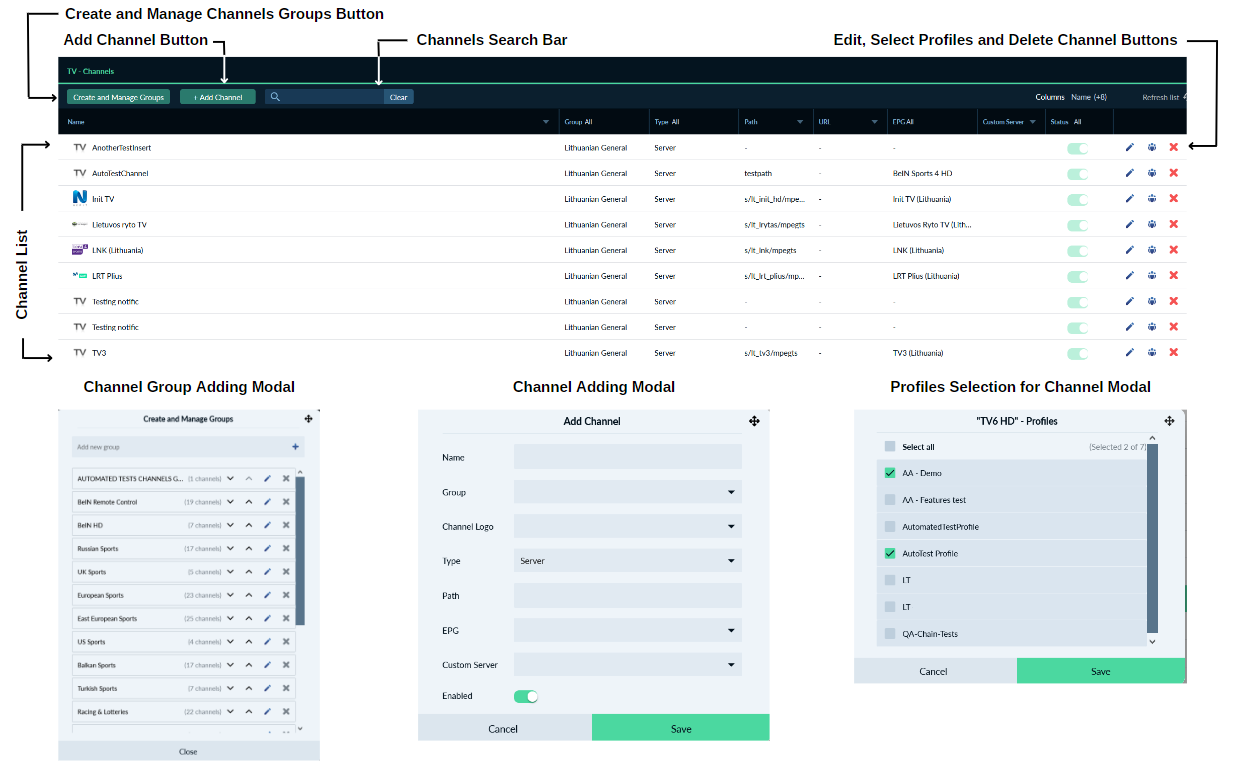 The Channels Settings Module is for channels and their groups managing for available profiles.
Same as on the settings-screens page on the channels page it is a search bar where is the possibility to search for a channel by different search phrases.
For adding a new channel group it only takes one click on the "Create and Manage Groups" button, write the wanted name for the channel group, and click the "+" to finish creating the channel group.
For adding a new channel the user should click on the "+ Add Channel" button. It will open up the channel creation modal where the user needs to fill in information about the new channel. It is needed to write a name and path of the channel, select a group, logo, server, EPG, custom server, and click the "Save" button. It is also possible to delete, edit and select profiles for the channel.
Created Channel will appear in the Settings Channels list and in the Sidebar TV tab on the dashboard page.
Servers
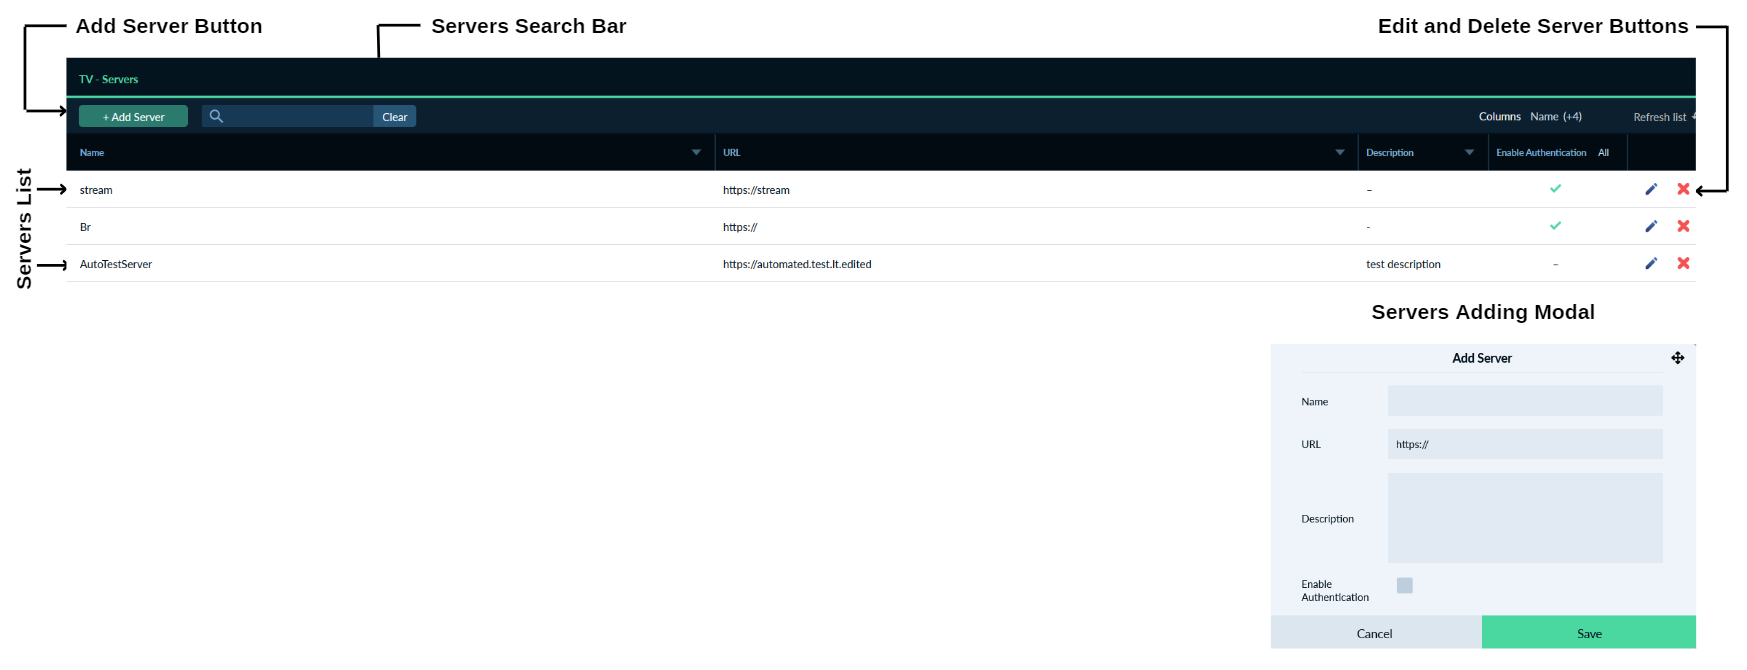 The Servers Settings Module is for servers management for available profiles.
Same as on the settings-screens page on the servers page it is a search bar where is the possibility to search for a server by different search phrases.
For adding a new server the user should click on the "+ Add Server" button. It will open up the server creation modal where the user needs to fill in information about the new server. It is needed to write a name, URL, and description of the server, enable or disable authentification, and click the "Save" button.
The created server will appear in the settings servers list and it will be possible to select the new server when creating or editing the channel. It is also possible to delete and edit the server.
Feeds
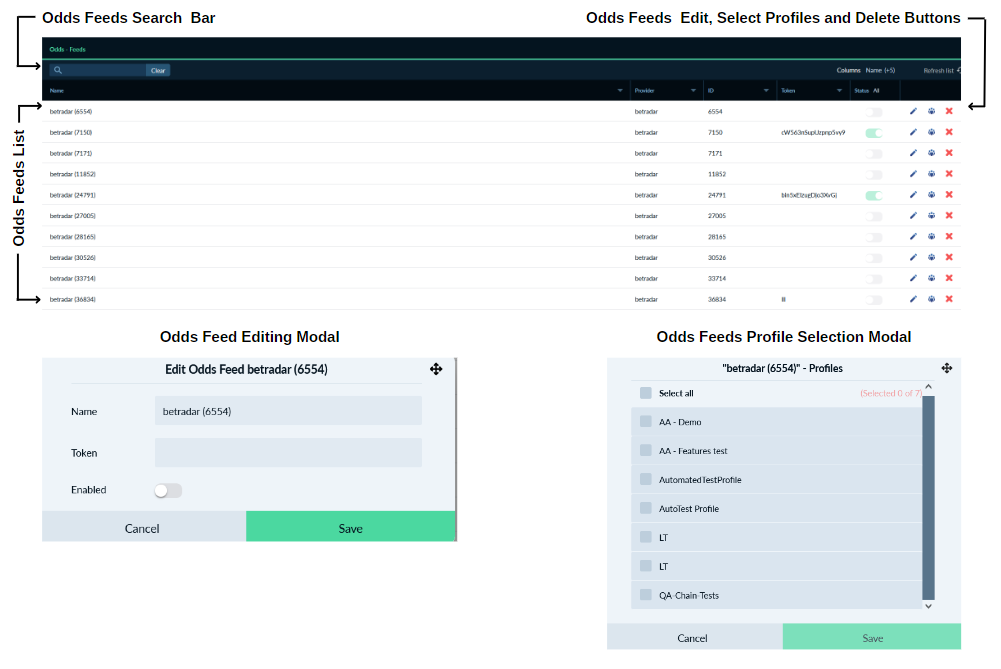 The Odds Feeds Settings Module is for settings for using the "Odds+TV" product management.
Same as on the settings-screens page on the odds feeds page it is a search bar where is the possibility to search for a feed by different search phrases.
For a user, it is not possible to add a new feed, it should be made by TV Manager Support. Separate odds can be edited or deleted, also it is possible to select profiles for the odds feeds.
Templates
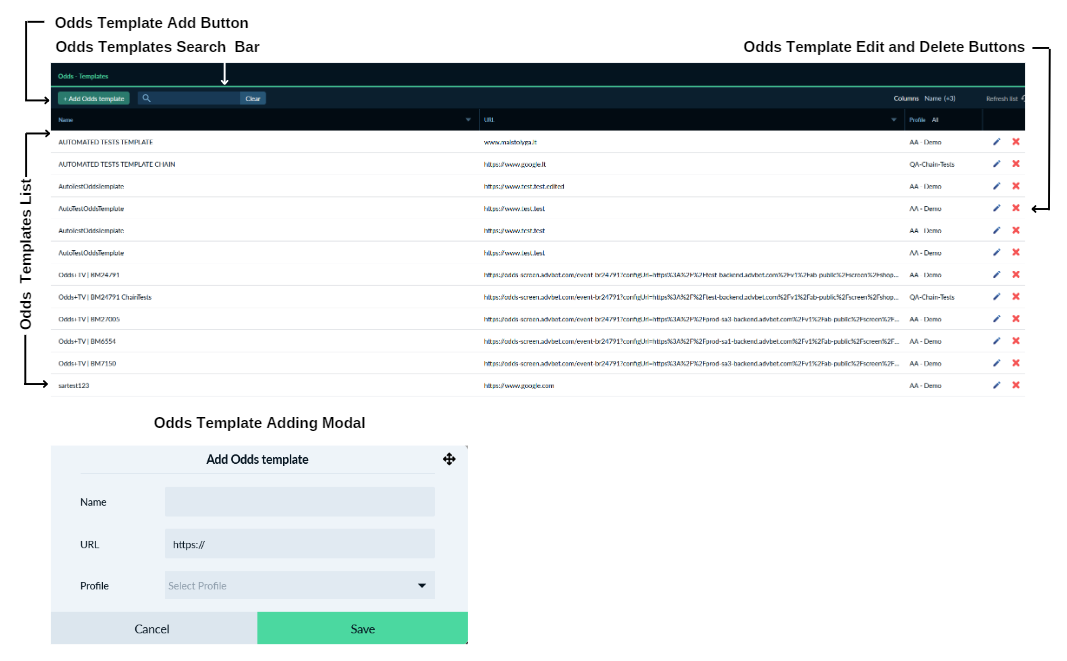
The Odds Templates Settings Module is for Odds Templates management for available profiles.
Same as on the settings-screens page on the odds templates page it is a search bar where is the possibility to search for a template by different search phrases.
For adding a new template it is needed to click on the "+ Add Odds Template" button. It will open up the odd template creation modal where it is needed to fill in information about the new template. It is needed to write a name, and URL, select profiles and click the "Save" button.
The created odd template will appear in the settings-odds-templates list. It is also possible to delete and edit the odd template.
TV Channels Mapping
The Odds channels TV Channels Mapping settings module is for TV channels with odds channels mapping.
Same as on the settings-screens page on the odds channels TV channels mapping page it is a search bar where is the possibility to search for odds or TV channels by different search phrases.
It is two possibilities to map odds channels to the TV channel. The first is by dragging and dropping the TV channel from the content sidebar to the odds channel. The second one is by editing the odds channel and selecting the TV channel from the TV selection modal.
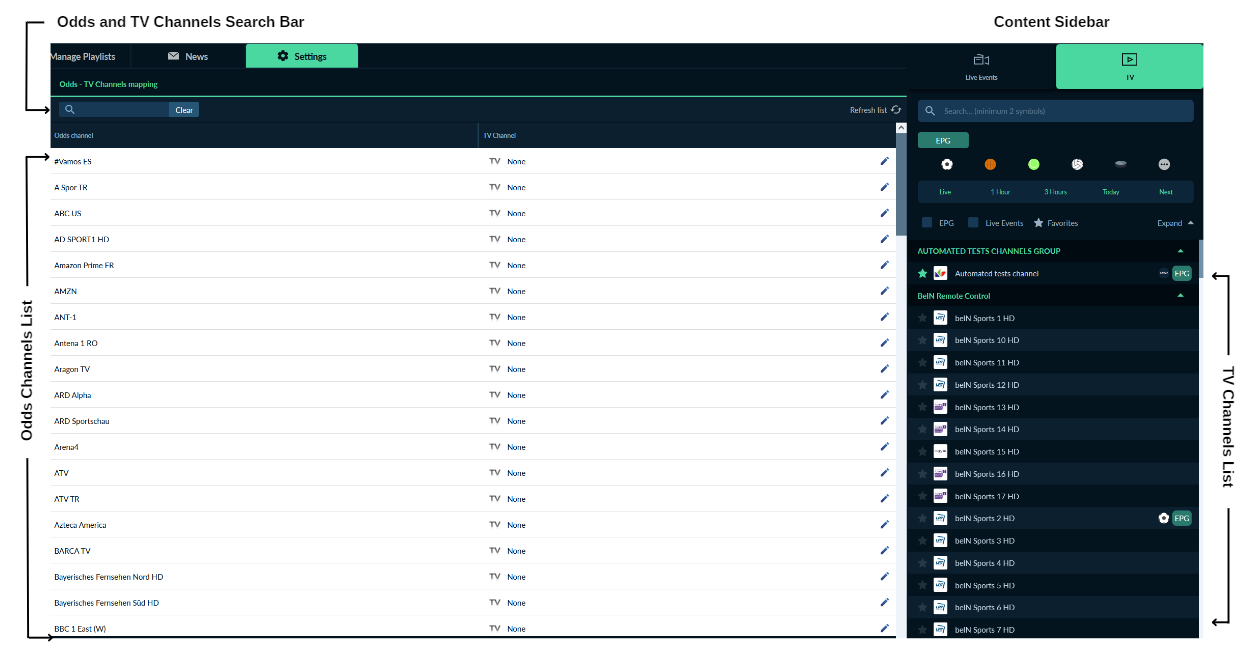
TV Events Mapping
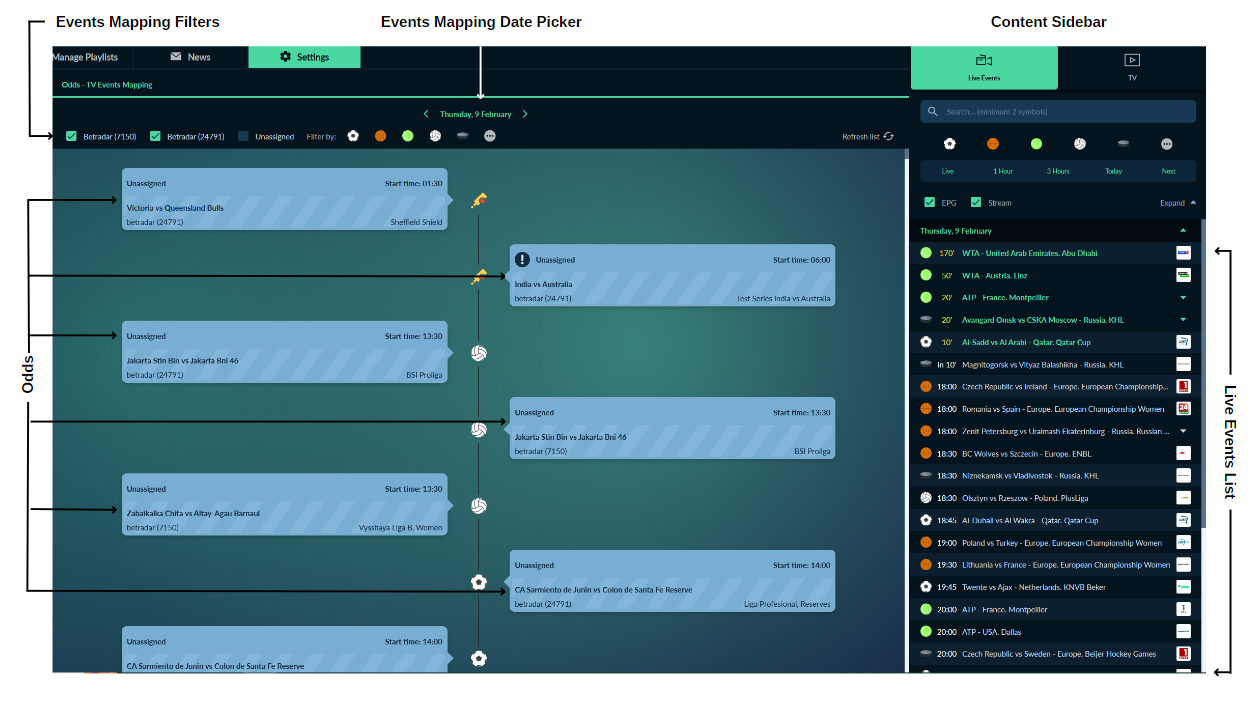 The Odds TV Events Mapping settings module is for TV channels or TV events with odds events mapping.
To map an odds event to the TV channel or TV event it is needed to drag and drop the TV channel or TV event from the content sidebar to the selected odd event.
It is possible to filter events mapping by odds feeds or by different sports.
For some odd events the "!" is attached with a suggestion on which channel should mapped.
Users
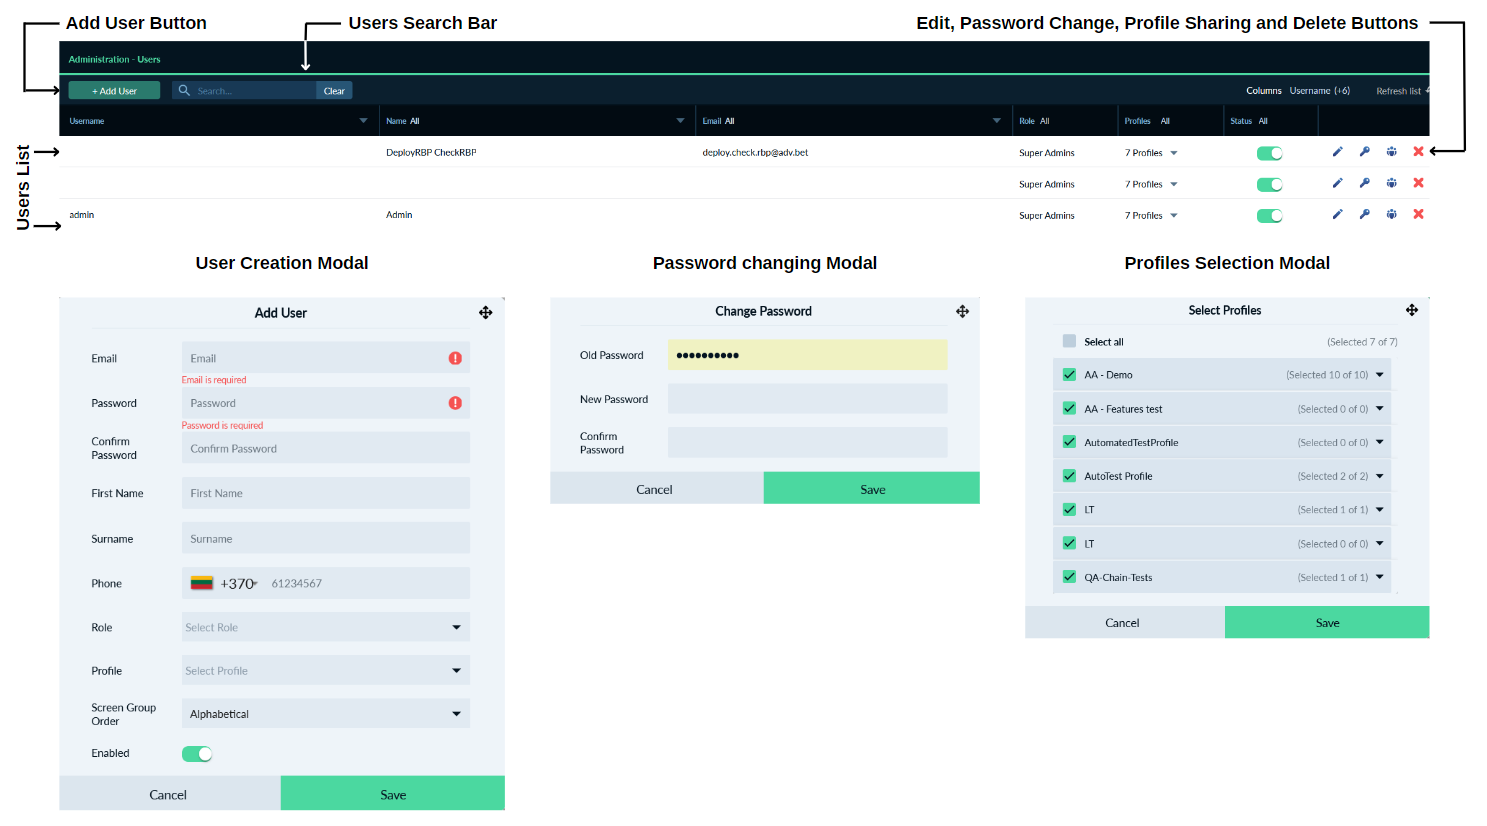 The Users Settings Module is for user creation and management.
Same as on the settings-screens page on the users page it is a search bar where is the possibility to search for a user by different search phrases.
For adding a new user it is needed to click on the "+ Add User" button. It will open up the user creation modal where it is needed to fill in information about the new user. It is needed to write an email, password, first name, surname, and phone, select role, and profiles, and click the "Save" button.
Created user will appear in the settings-users list and the created user can now log in to the TV Manager. It is also possible to delete and edit the user, select profiles, and change passwords.
Profiles
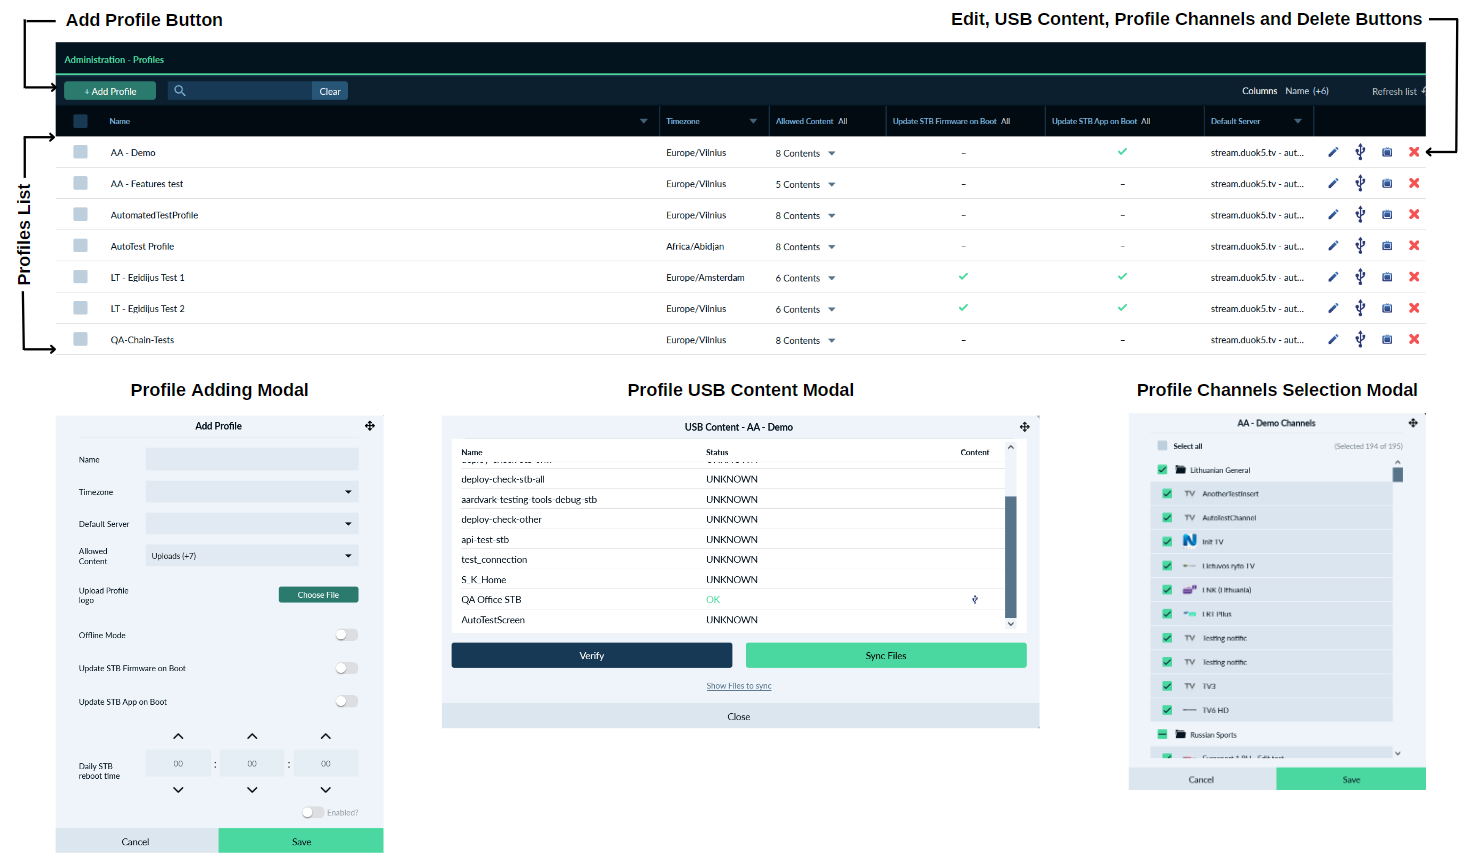 The Profiles Settings Module is for profiles management. On the settings-profiles page the list of all profiles added to TV Manager is displayed.
Same as on the settings-screens page on the profiles page it is a search bar where is the possibility to search for a profile by different search phrases.
For adding a new profile the user should click on the "+ Add Profile" button. It will open up the profile creation modal where the user needs to fill in information about the new profile. It is needed to write a name, select the time zone, default server, and allowed content, upload profile logo, enable or disable offline mode and firmware and app updates on boot, select daily STB reboot time if needed, and click the "Save" button.
Created Profile will appear in the Settings Profiles list. It is also possible to delete and edit the profile, select TV channels that will be available to be used on the profile, and manage USB content on the Set-top-boxes of the profile.
It is a possibility to set an update STB firmware and app on boot, for multiple selected profiles by selecting wanted profiles and clicking the update buttons above the profiles list.
Roles
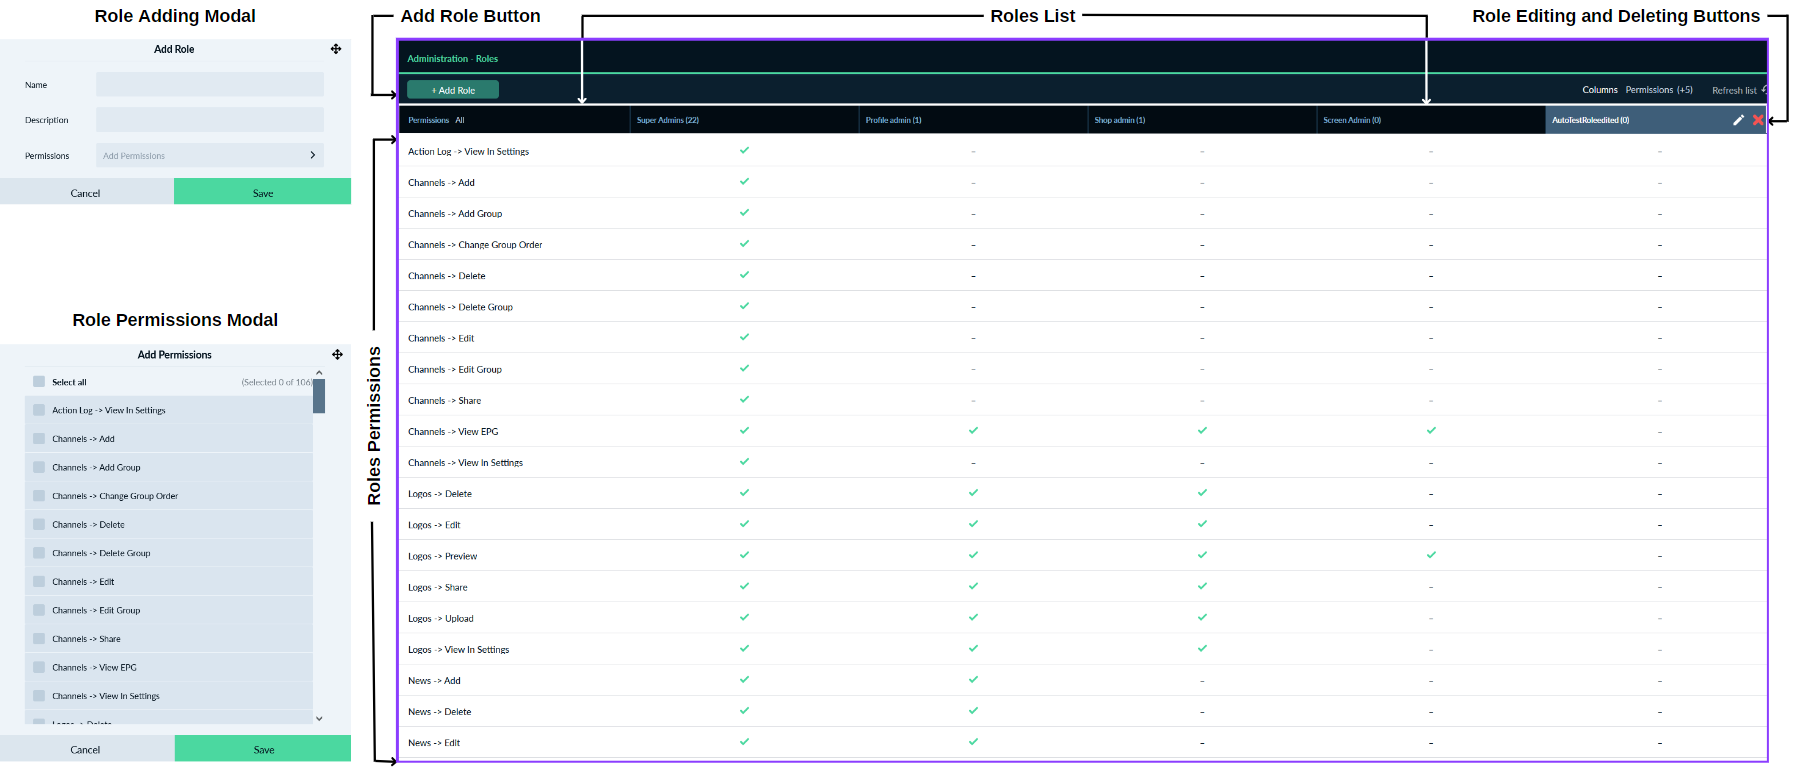 The Roles Settings Module is for roles and their permissions management.
For adding a new role the user should click on the "+ Add Role" button. It will open up the role creation modal where the user needs to fill in information about the new role. It is needed to write a name and description, select wanted permissions, and click the "Save" button.
The created role will appear in the settings roles list and it will be possible to select the role when creating or editing the user. It is also possible to delete and edit the role and their permissions.
Action Log
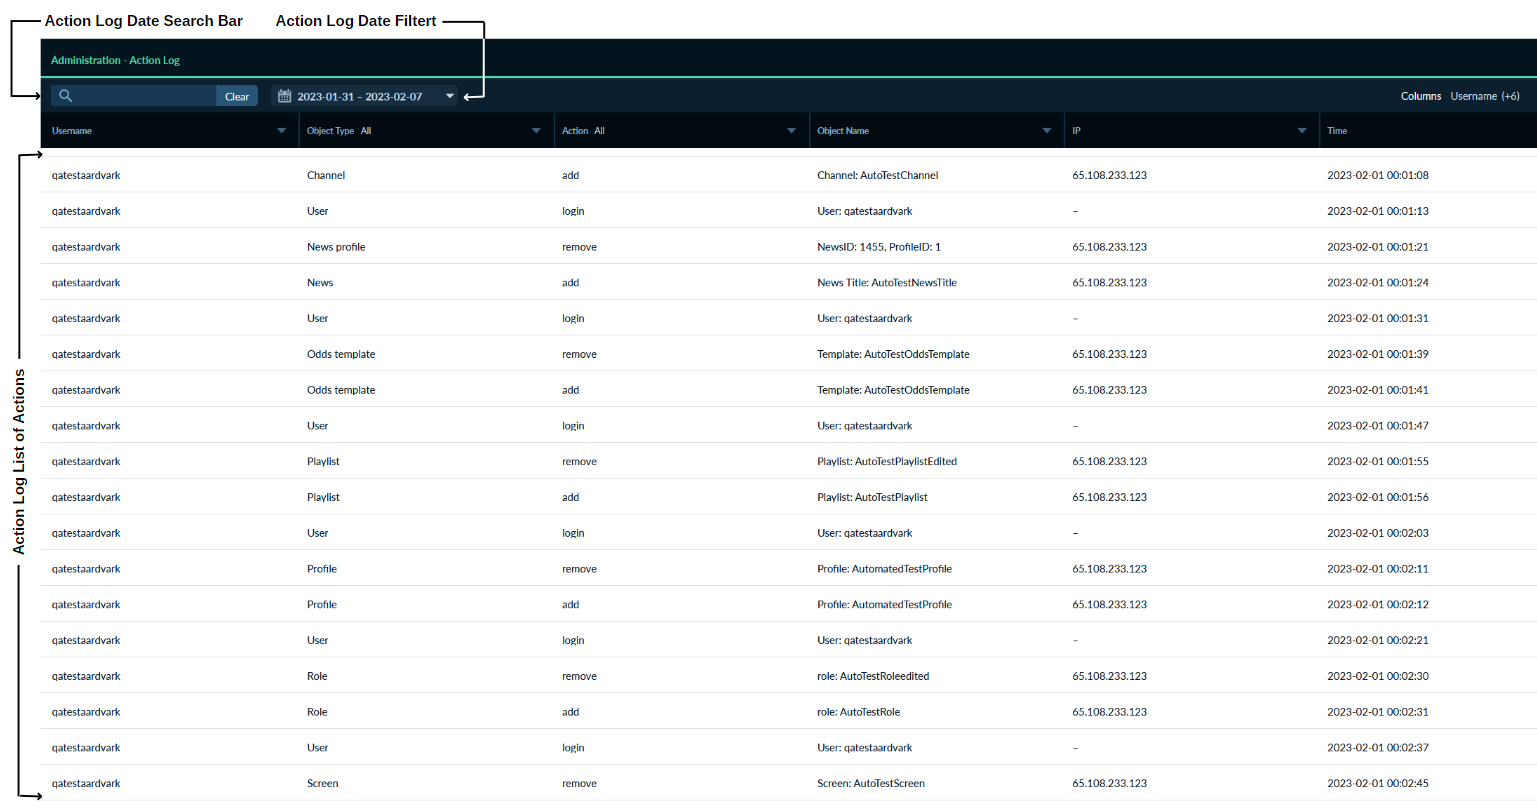 The Action Log Module is for user action checking.
Same as on the settings screens page on the action log page it is a search bar where is the possibility to search for an action by different search phrases. It is also possible to filter actions by date, action, and object type and to sort by name, object type, action object name, IP, and time.
On every action log item row, it is an "I" icon, by clicking on it the user can see more info about the action.
